
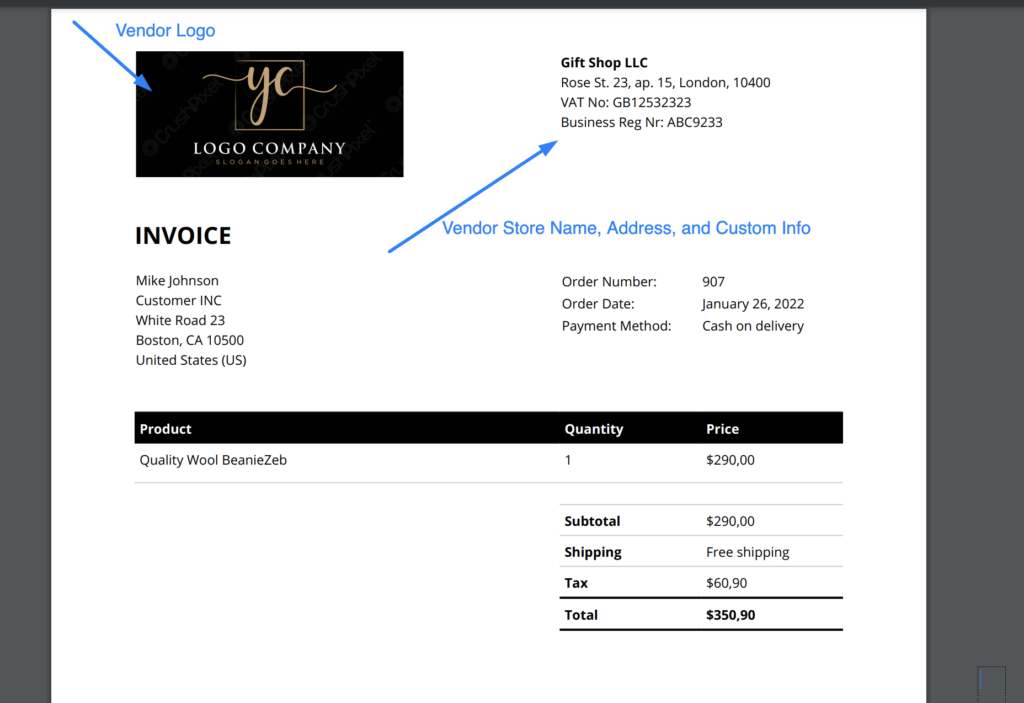
The vendor invoices & packing module allows each of your vendors to have their own invoices, complete with their logo, store name, address, and any other relevant information. Vendors can also print packing slips and shipping labels.
This module requires that you also use one of the following free plugins:
- PDF Invoice & Packing Slips by WP Overnight (Recommended). This is the most popular WooCommerce invoicing plugin. You can find it by going to your WordPress admin backend -> Plugins -> Add New and searching for "pdf invoice". It will be the first option.
- WooCommerce PDF Invoices, Packing Slips, Delivery Notes and Shipping Labels by WebToffee. This is the second most popular plugin. It also supports shipping labels and a few other additional options.
Vendor Invoice Settings
Once the invoice module is enabled and an invoicing plugin is active, each vendor will find a dedicated "Invoicing" panel in their vendor dashboard.
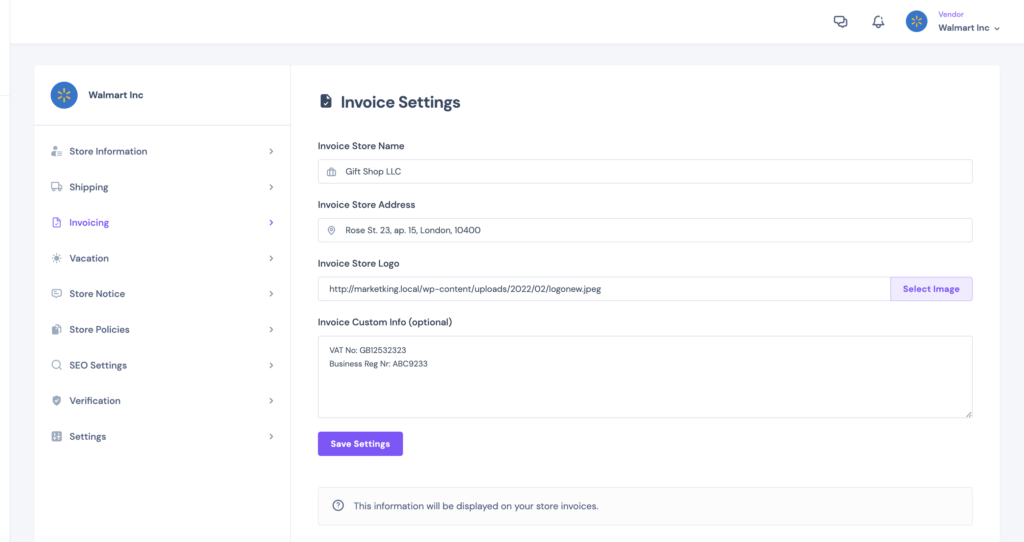
Here the vendor can enter:
- Store name to be displayed on invoices
- Store address to be displayed on invoices
- Store logo
- Custom info (can be anything from a VAT number to any other relevant company data)
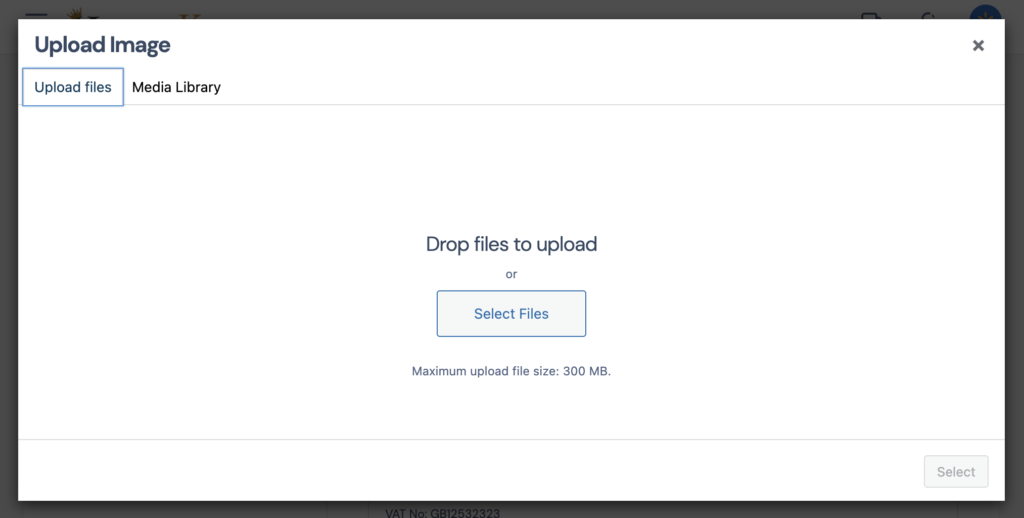
The store logo select button opens an image uploader. Each vendor has access only to their own private library of images.
This information is shown directly on the generated PDF invoices:
1. Using PDF Invoice & Packing Slips by WP Overnight
Customer Invoice Download
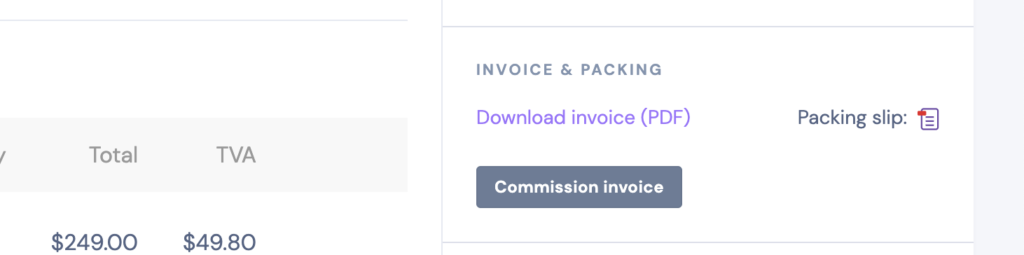
Customers can download invoices by going to My Account -> Orders. There they will find an "Invoice" button.
In the case of composite orders (orders from multiple vendors), there are separate invoices for each vendor, as well as an overall invoice for the entire order.
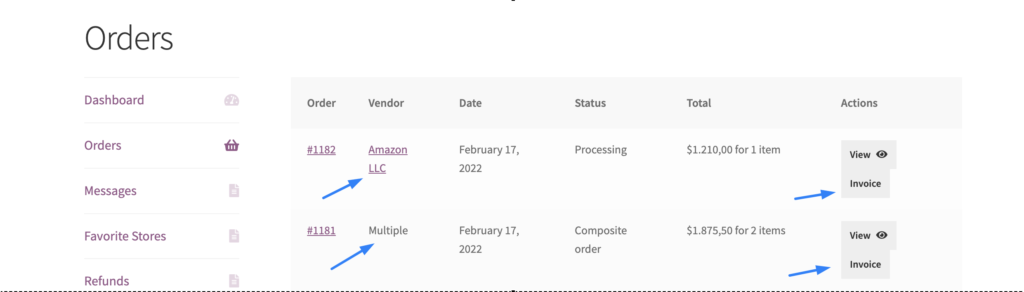
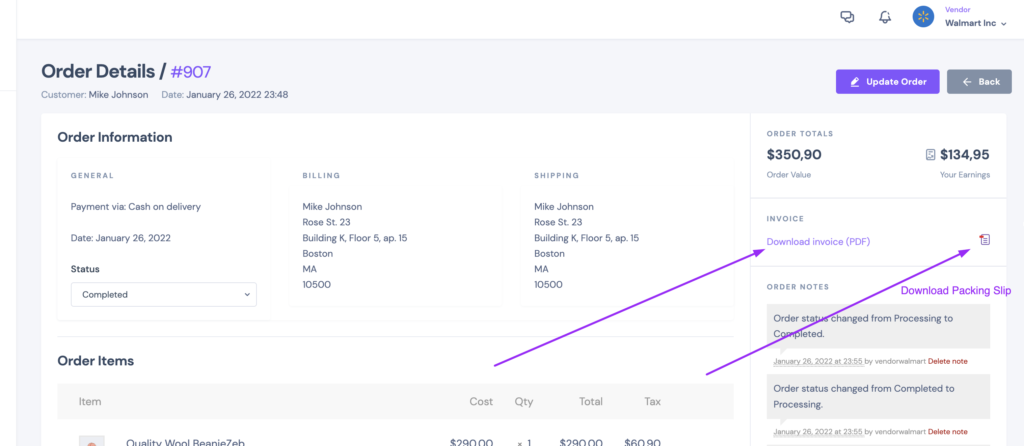
Vendor Invoice Download
Vendors can also download invoices by going to Orders in their dashboard and clicking on "Manage Order". In the order details panel, the vendor will find 2 buttons: one that downloads a PDF invoice and another that downloads a PDF packing slip.
If packing slips are not relevant to your site and you'd like them disabled, you can do so by adding the following code snippet to the site:
add_filter('marketking_enable_packing_slip_invoices_vendors', function($val){
    return false;
}, 10, 1);
Other Things to Note
The admin can also configure details for the admin's own store invoices, or for composite orders. This is done in the settings panel under WooCommerce -> PDF Invoices.
Important: Once an invoice has been generated, it is not updated when settings are changed. Changing invoice settings does not affect already generated invoices. If you need this to happen, you must enable "test mode" in WooCommerce -> PDF Invoices.
2. Using PDF Invoices Plugin by WebToffee
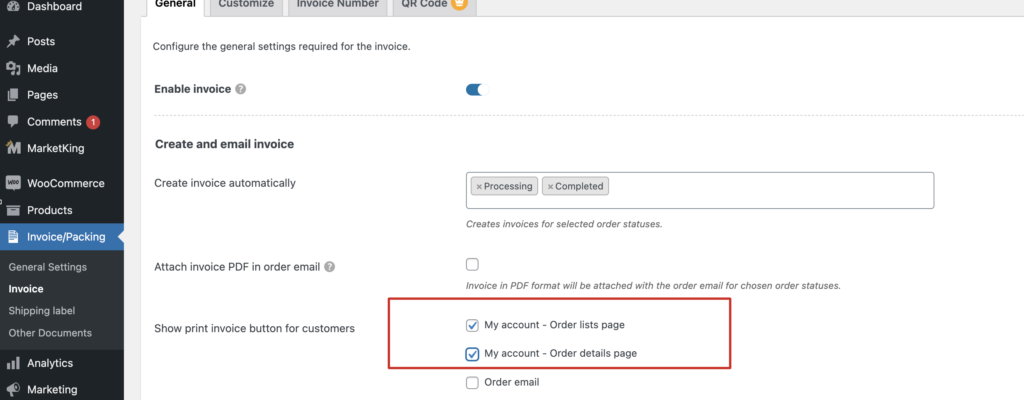
For customers to be able to download invoices in My Account, you must enable the following settings:

Customers can then download invoices from My Account as follows:

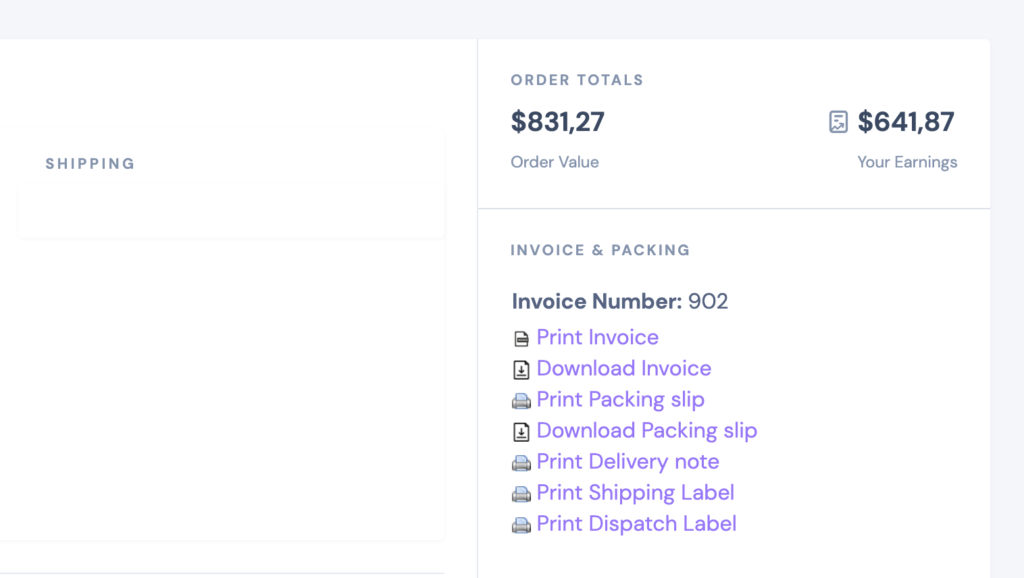
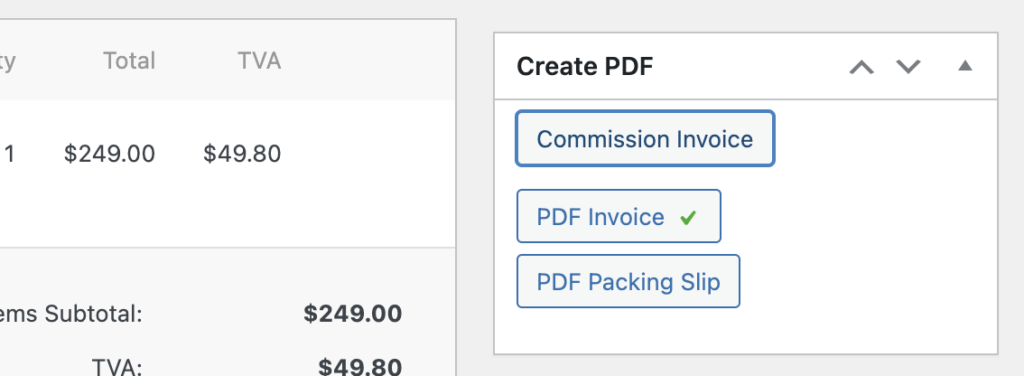
Vendors can also download invoices, packing slips, shipping labels, etc.:
Important settings:
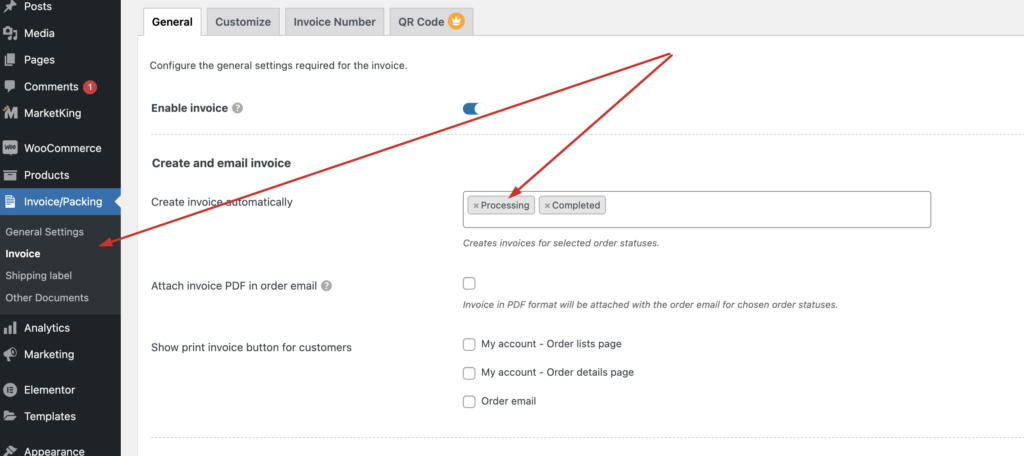
For vendors to be able to generate invoices, you would usually need to enable 'Processing' here, so that invoices are generated automatically when the order is placed:
Other Information
MarketKing has been tested with the free versions of the above plugins, but not with the premium versions. They will likely work in the same way; however, please note that we do NOT guarantee that every single feature and option of these plugins or their premium versions will be compatible.
Commission Invoices (New!)
We have now added a 'commission invoice' option, so that each vendor can invoice the marketplace for their commission. This feature currently only works with the WP Overnight integration.
For this to work, commission invoices must be enabled in MarketKing -> Settings -> Invoices. Vendors will then see a 'commission invoice' button in their vendor dashboard.
A similar button is also available on the admin side:
By default, these invoices do not include VAT. If you would like them to include VAT, you can use this PHP code snippet:
add_filter('marketking_commission_invoice_have_vat', function($have_vat, $vendor_id){
	$have_vat = true;
	return $have_vat;
}, 10, 2);
add_filter('marketking_commission_invoice_vat_rate', function($vat_percentage, $vendor_id){
	$vat_percentage = 16;
	return $vat_percentage;
}, 10, 2);
The snippet can also set a VAT rate to be used on the invoice. The $vendor_id variable can be used to set it differently for each vendor.
Sequential Invoice Numbers
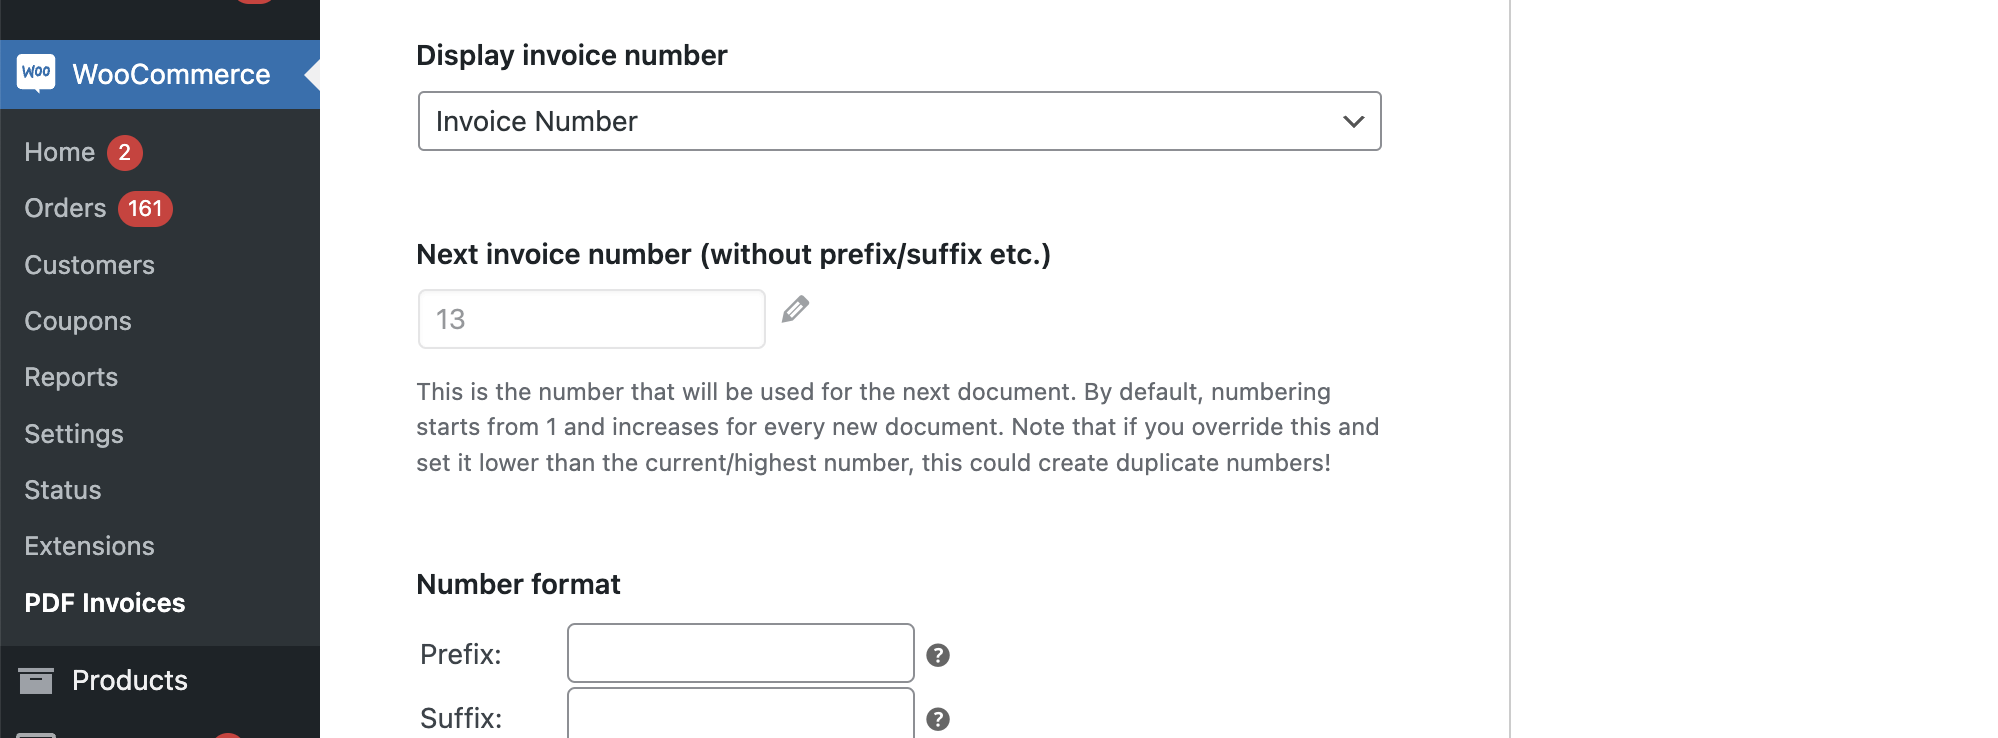
You may want to enable invoice numbers and have them be sequential. You can do this as follows with the PDF Invoice & Packing Slips plugin:
In the invoice plugin's settings, enable the display of the invoice number as follows:
Then you can add this PHP code snippet to your site:
add_filter('woocommerce_invoice_number', function($nr, $order_id){
    $vendor_id = marketking()->get_order_vendor($order_id);
    $vendor_orders = get_posts( array( 'post_type' => 'shop_order','post_status'=>'any','numberposts' => -1, 'author'   => $user_id, 'fields' =>'ids', 'order' => 'ASC') );
    $order_number = 1;
    foreach ($vendor_orders as $vendor_order){
        if ($vendor_order == $order_id){
            break;
        }
        $order_number++;
    }
    return $order_number;
}, 10, 2);
The above code will set a sequential invoice number for each vendor, starting at 1.
So each vendor would get 1, 2, 3 for their own orders.
If you'd like, you can further modify this to add a prefix, suffix, vendor ID, etc.
For example, you could write it as:
return 'V'.$vendor_id.'O'.$order_number;This will result in invoice numbers with a structure such as V4O15 (vendor 4, order 15).
You can make other changes as well. You can change
$order_number = 1;to
$order_number = 100;This will make order numbers start at 100 for each vendor and go to 101, 102, 103, etc.