
In MarketKing 1.2.0, we are introducing a new module: MarketKing Stripe Connect.
Through this module, vendors can sign up and connect their Stripe accounts, and then get paid automatically. The module also supports 3D Secure 2 authentication, as well as automatic refunds (vendors can reject or approve refunds via the vendor dashboard).
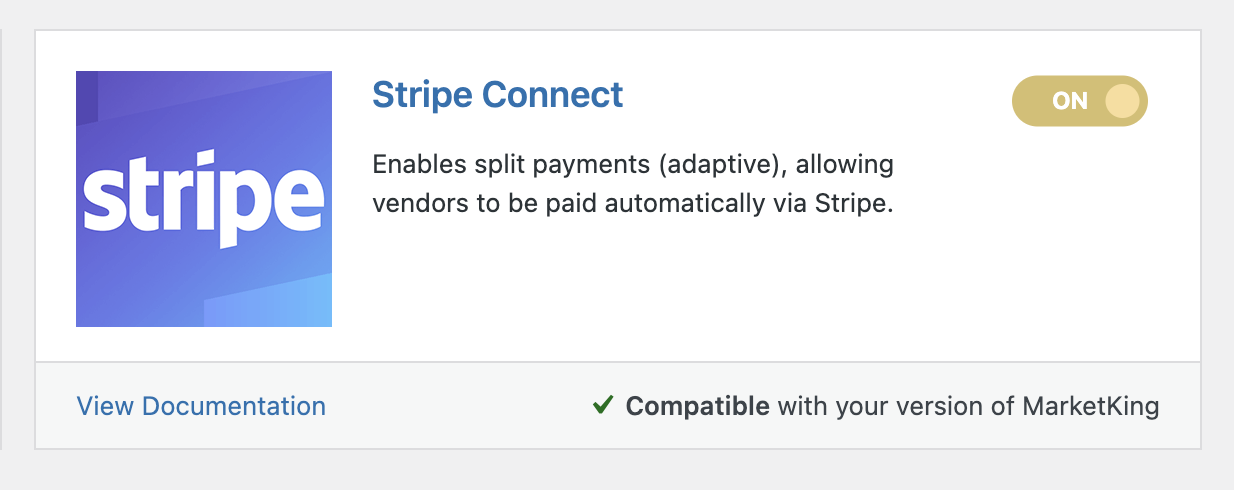
This Stripe module is a complete standalone solution, meaning that no other Stripe plugins are necessary - this module can also handle simple transactions such as only the admin getting paid (no vendors involved).
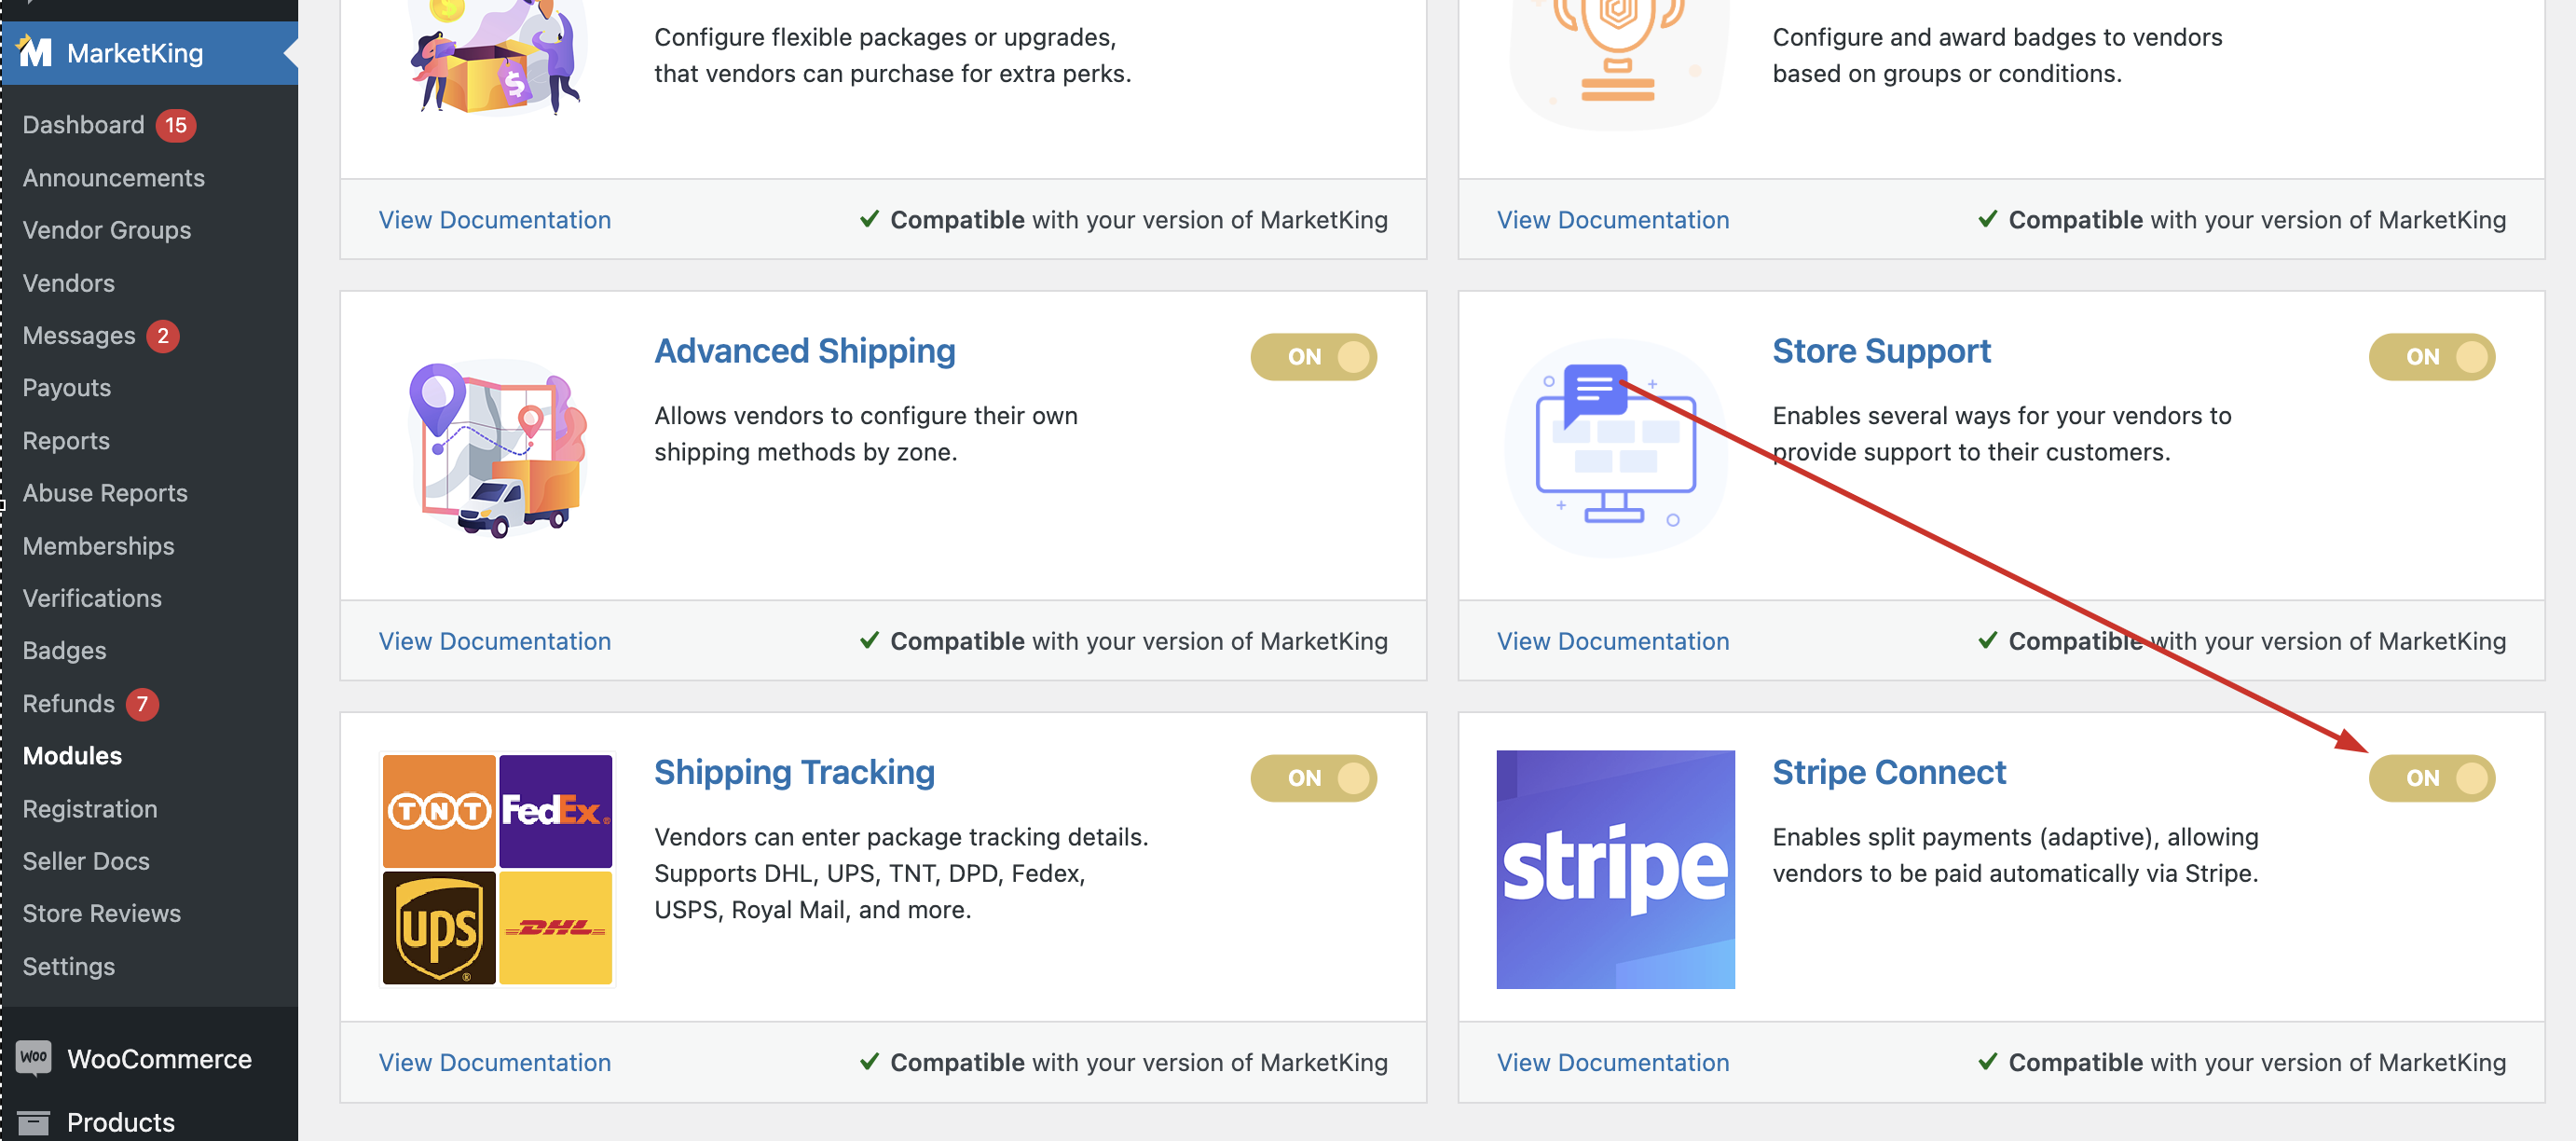
How to Enable the Stripe Connect Module
To enable the Stripe module, go to MarketKing -> Modules and turn on the 'Stripe Connect' option.
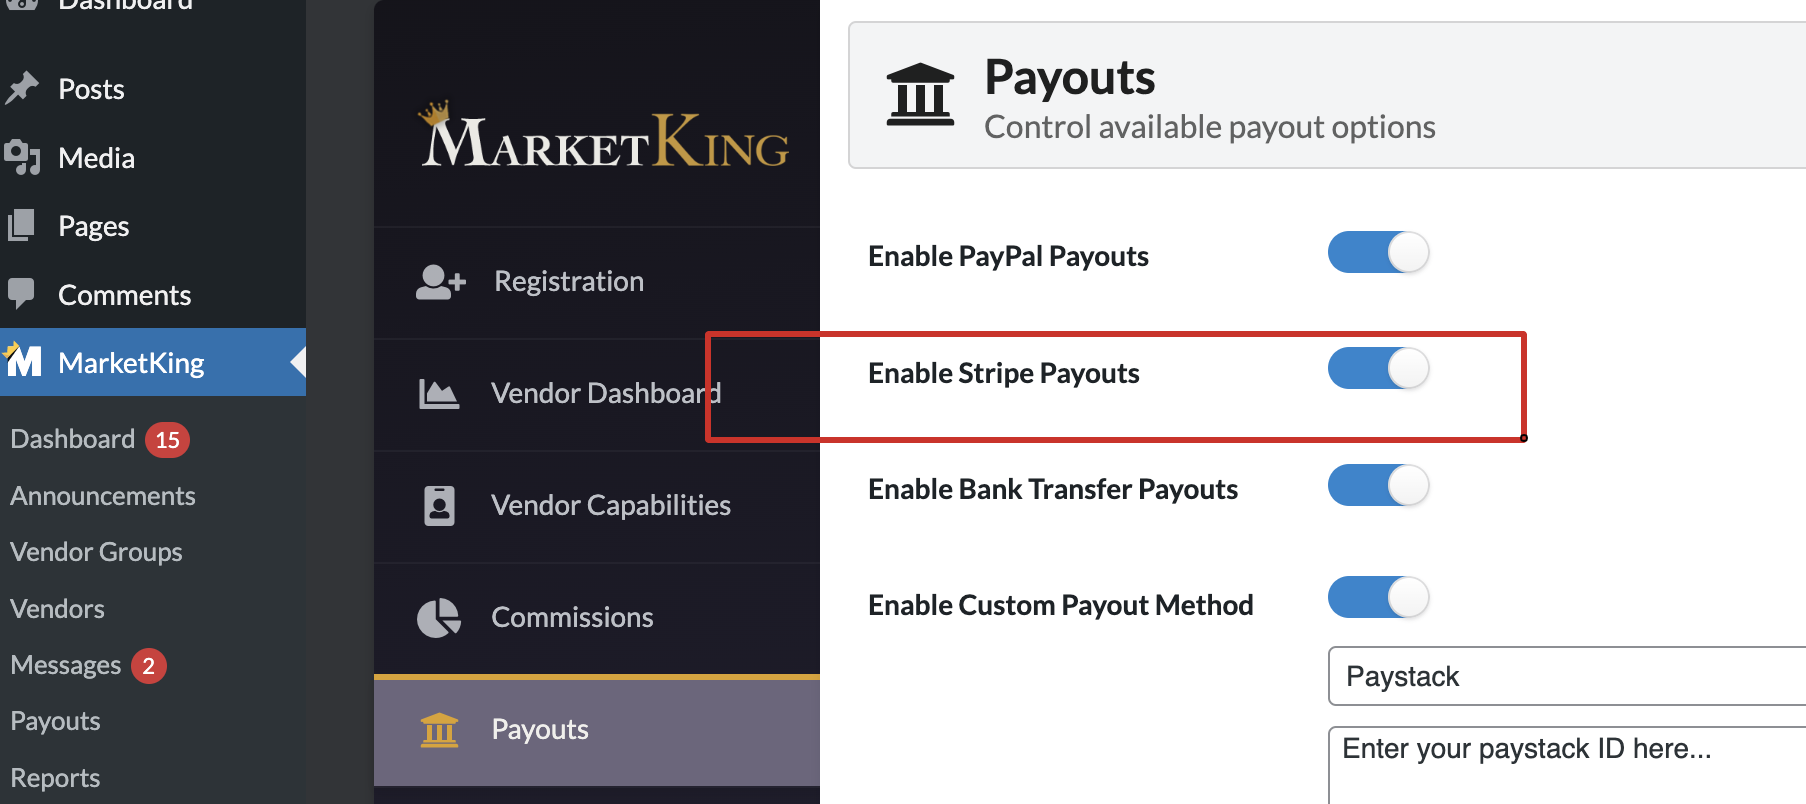
After this has been enabled, you should now go to MarketKing -> Settings -> Payouts and enable Stripe Payouts as an option.
Configuring Stripe Connect Settings (Admin)
Now that the Stripe Connect module has been enabled, you can head to WooCommerce -> Settings -> Payments where you can find the newly added 'MarketKing Stripe Connect (Split Pay)' method.

Enable this method and click on it to configure it, and you will find the following settings:
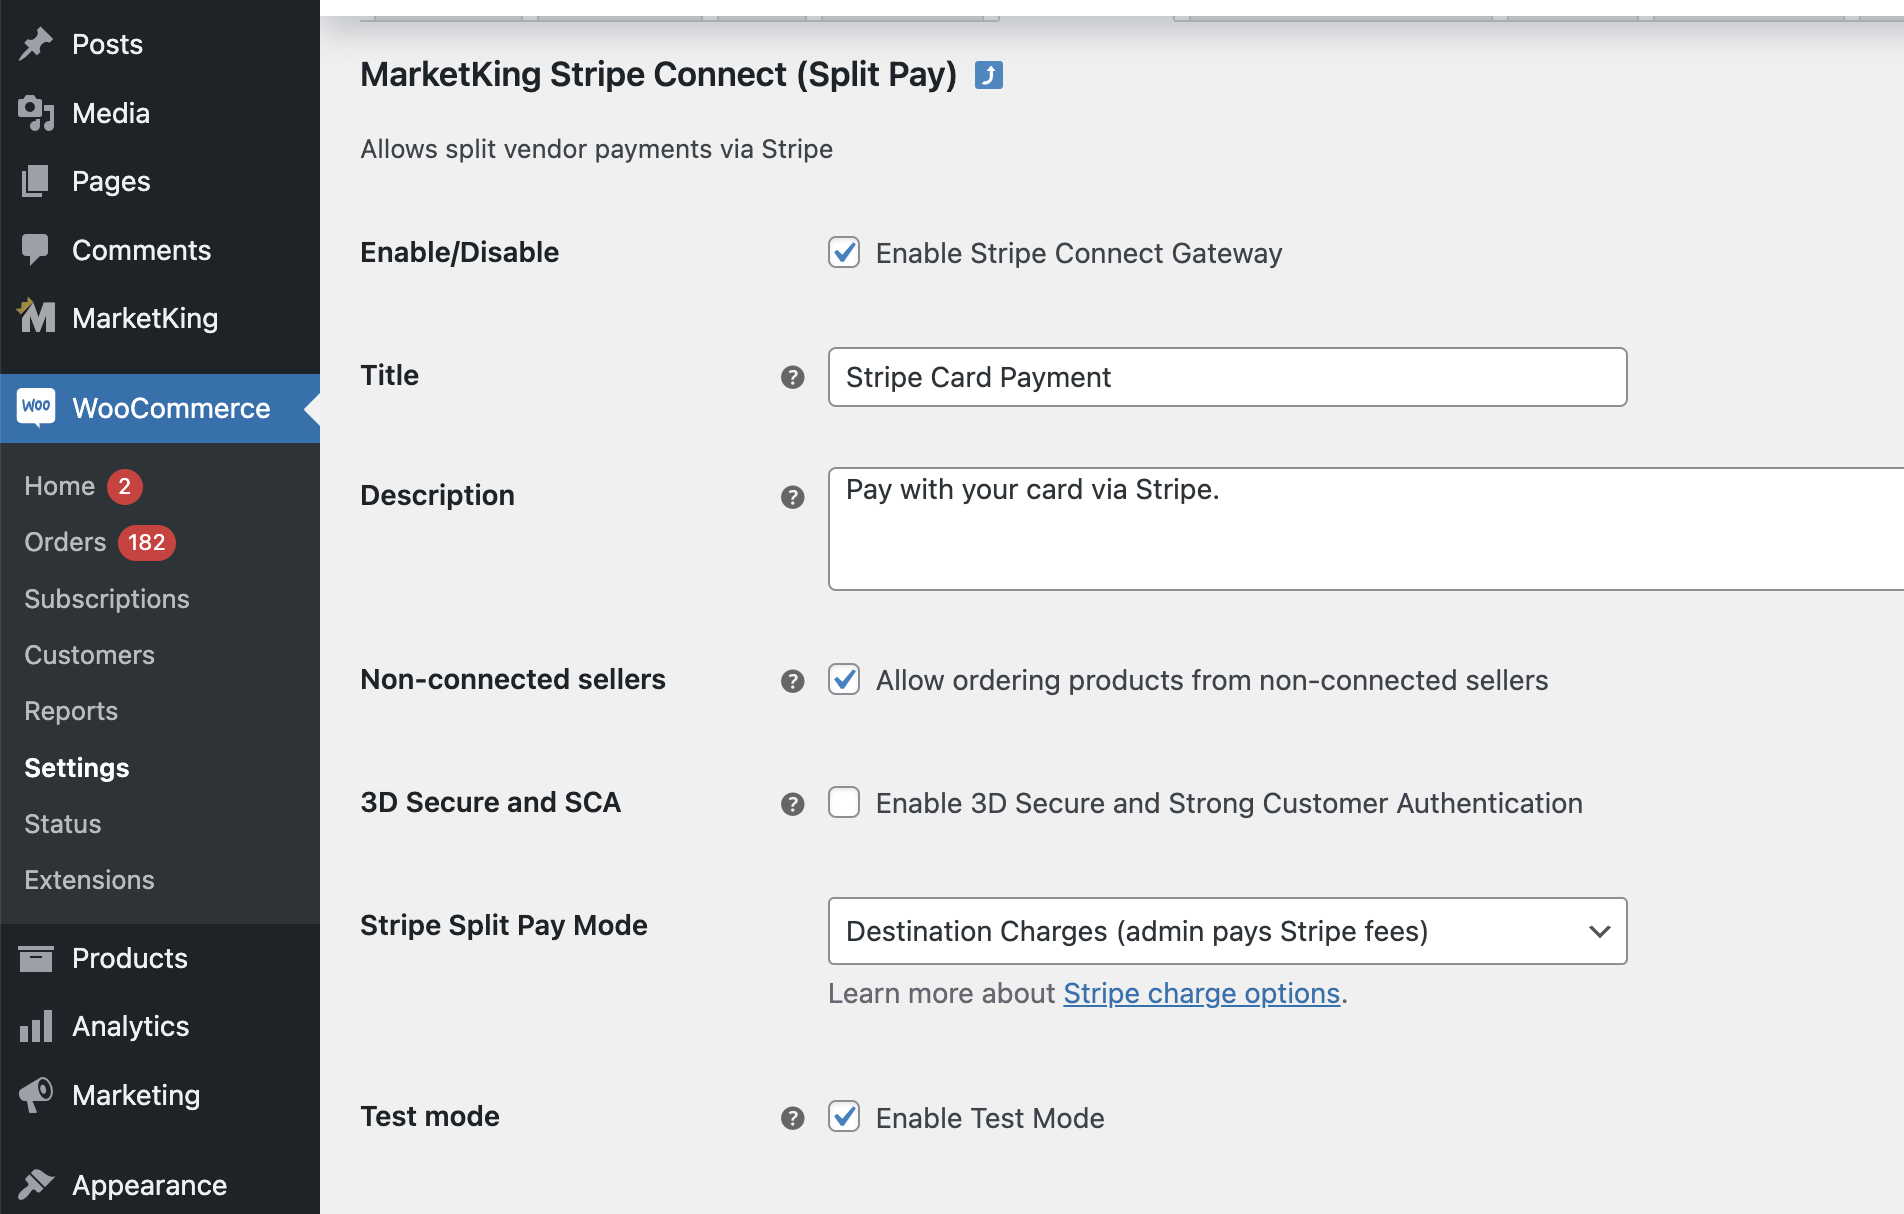
Let's see what these settings do:
Non-connected sellers - allow ordering products from non-connected sellers
If this is disabled and a customer tries to place an order from a seller that did not connect their Stripe account, then the gateway will show an error and will not allow the customer to place the order.
If this is enabled instead, then the payment will go to the admin's Stripe account directly, and the vendor's balance will be increased (the balance is the amount that the admin owes the vendor).
Stripe Split Pay mode
There are 2 main options here:
- Direct charges - vendor pays Stripe fees
- Destination charges - admin pays Stripe fees
For more details on what these options represent, please see the Stripe charges documentation directly: https://stripe.com/docs/connect/charges
Choosing between one of these will usually be based on who you want to pay the Stripe processing fees. If you want to vendor to pay them, choose the Direct charges option, otherwise choose the Destination option.
3D Secure and SCA
Important! - This method can only be enabled if both admin and vendors are in the same region (both in Europe, or both in the U.S.). Furthermore, In 3DS mode, the vendor's Stripe currency must be the same as the site / admin Stripe account currency, otherwise the transfer from admin to vendor will fail.
When this method is enabled, a different charge option is used (Transfer Charges), and the Admin pays the processing fees.
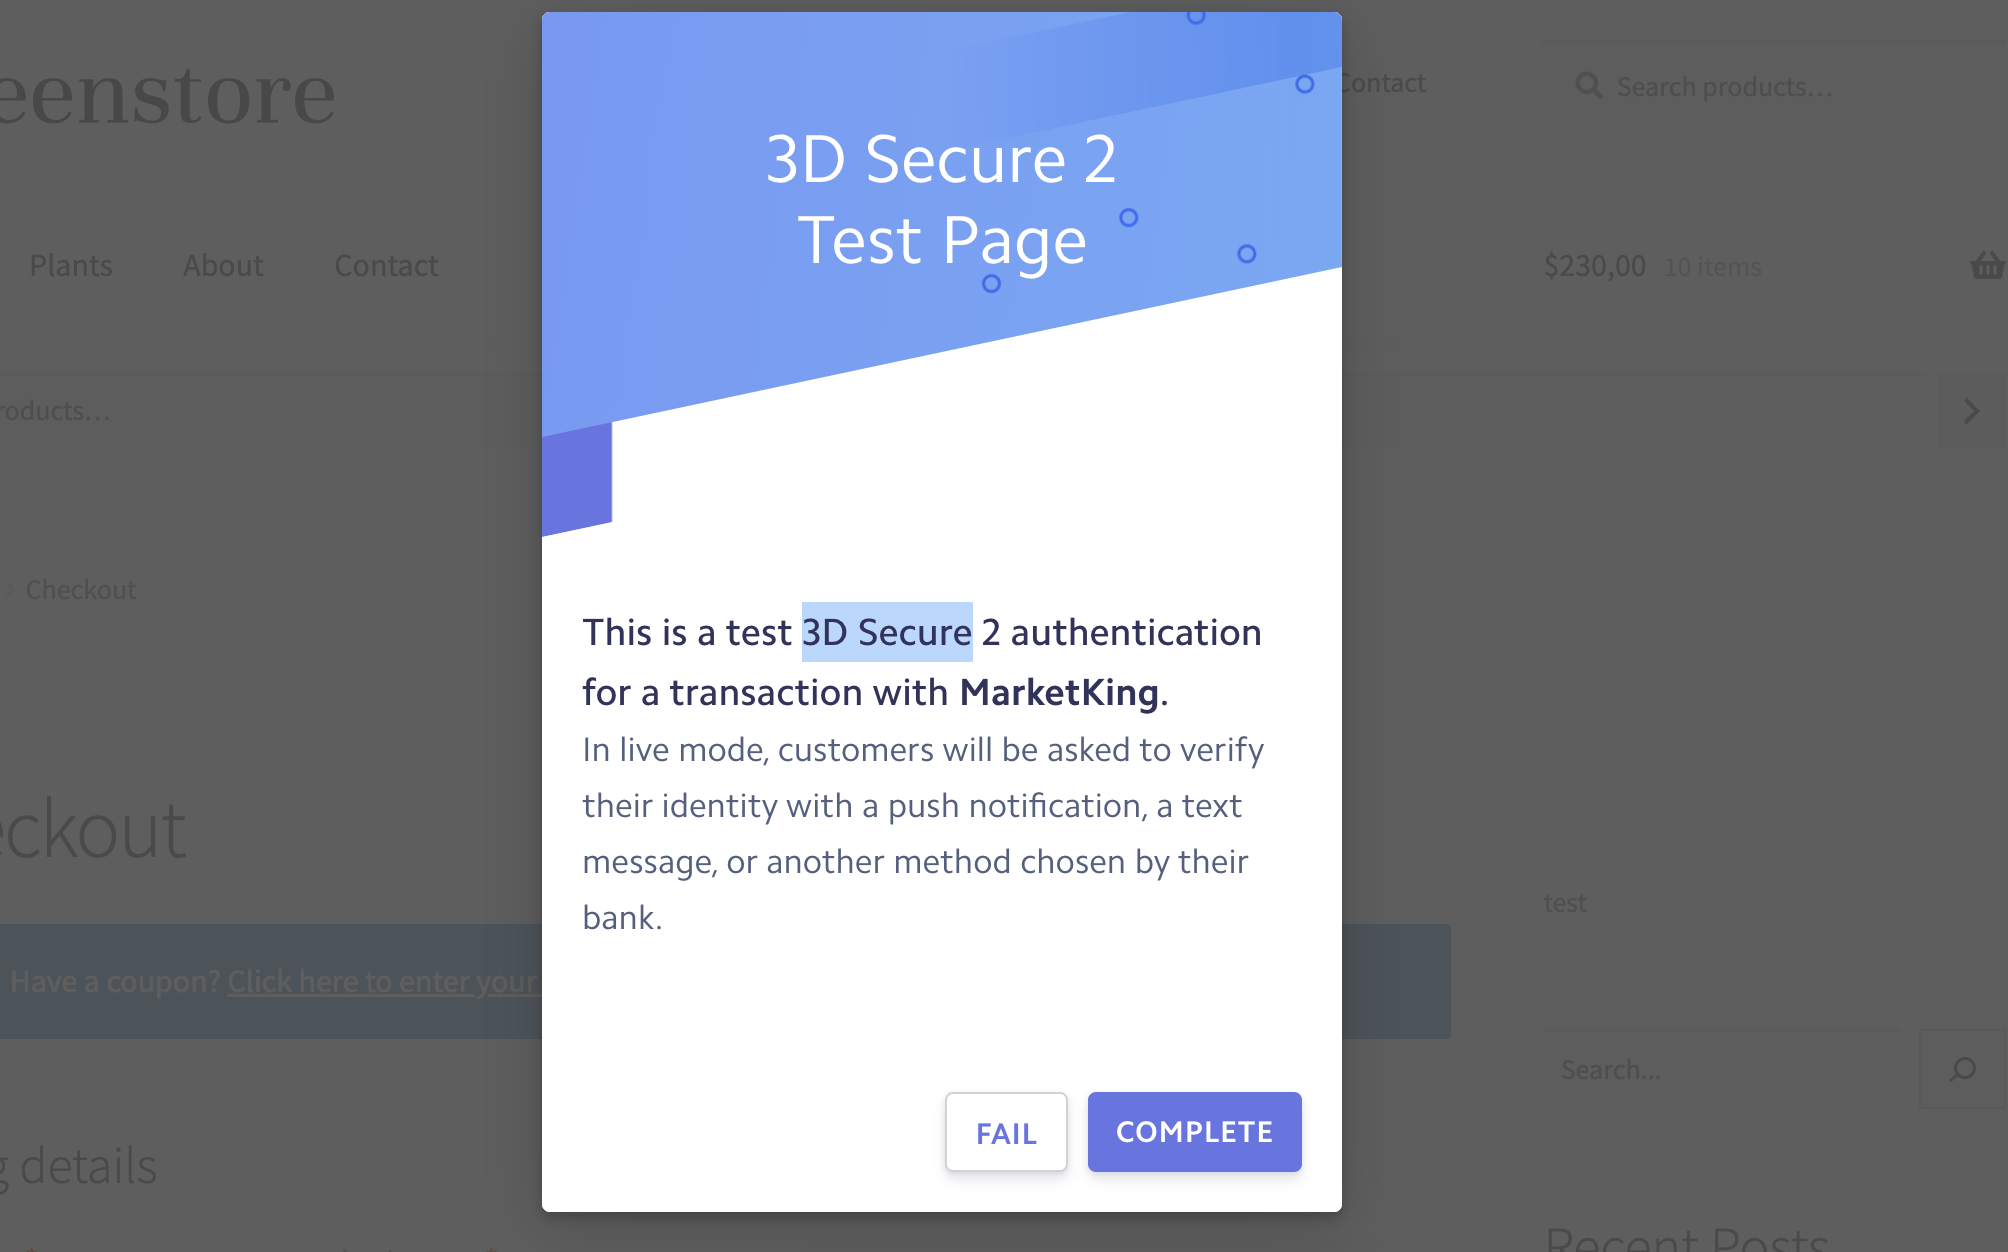
When this is enabled, during checkout customers will see a 3DS authentication prompt for confirmation with their bank.
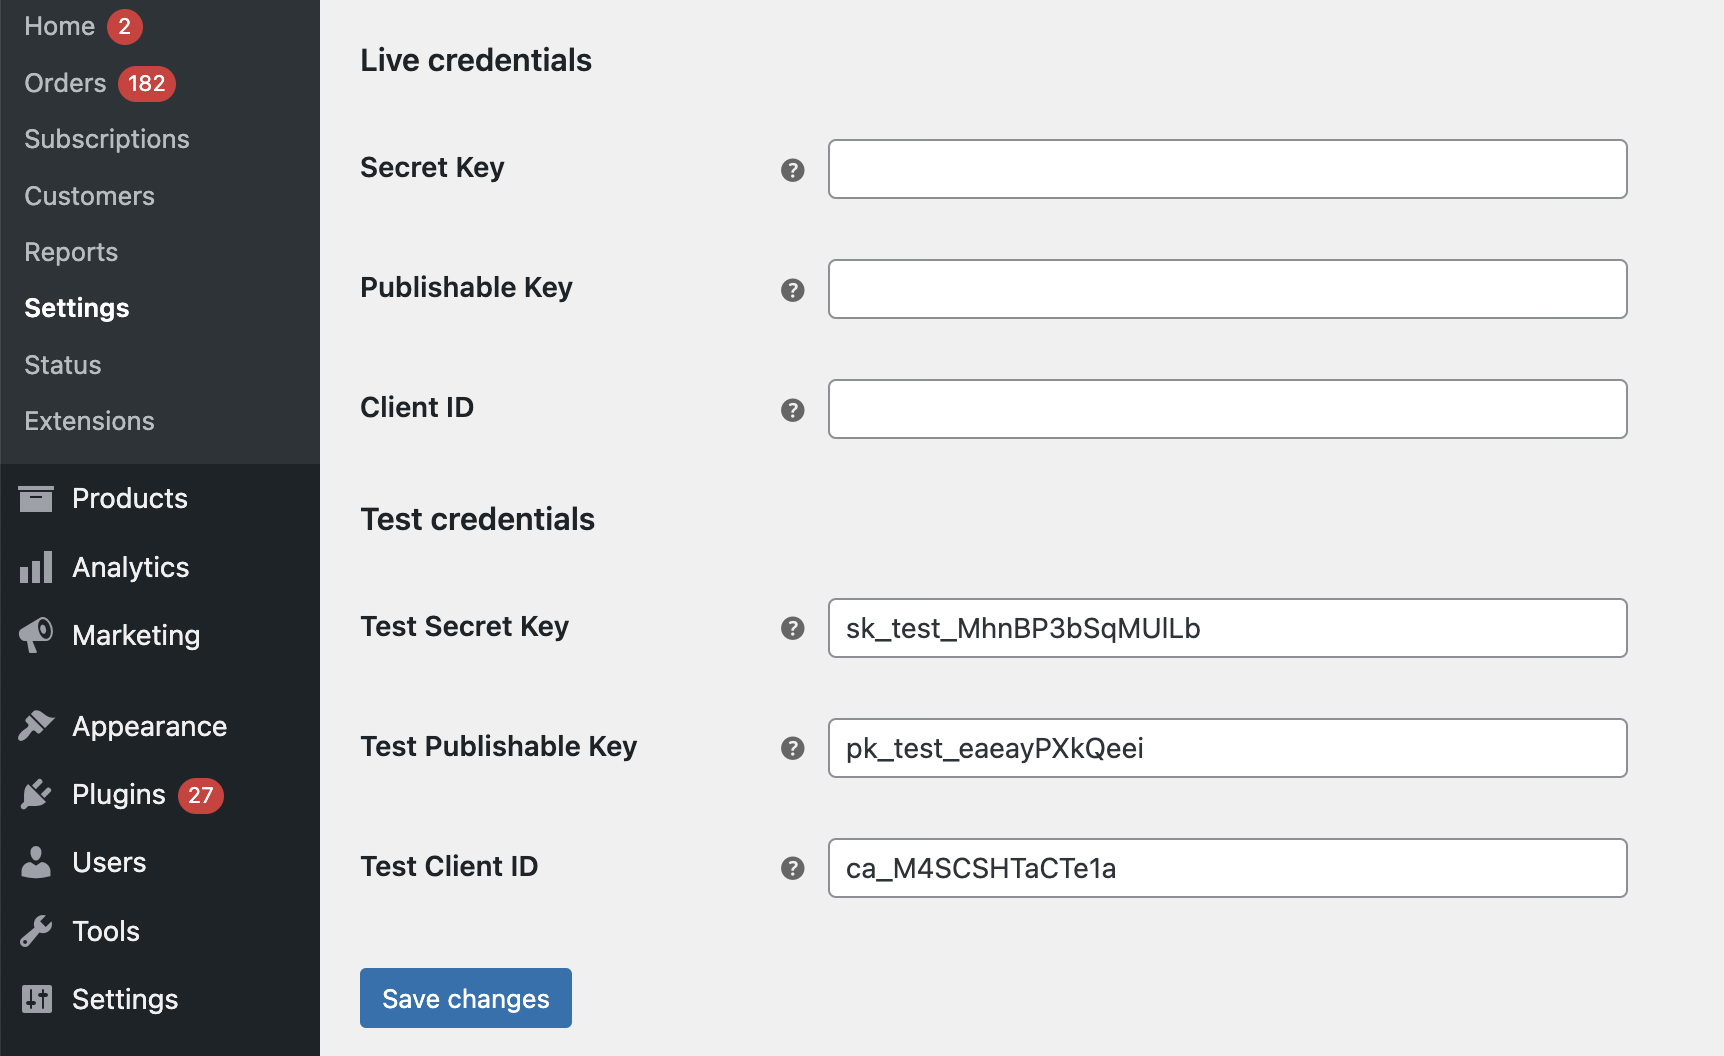
Test mode
Test mode should be enabled when you are testing the integration and you want the plugin to use the Test Credentials. There are fields for both test credentials and live credentials that you can configure. You can get these credentials from your Stripe account, as explained below.
Stripe Account Credentials and Settings
Let's now take a look at your Stripe account settings and how you can get the necessary API keys.
Sign Up or Login
You will need to login to your Stripe Account first. If you don't already have an account, then sign up and proceed to verify your account. Finally, sign in.
Generating Test and Live API Credentials
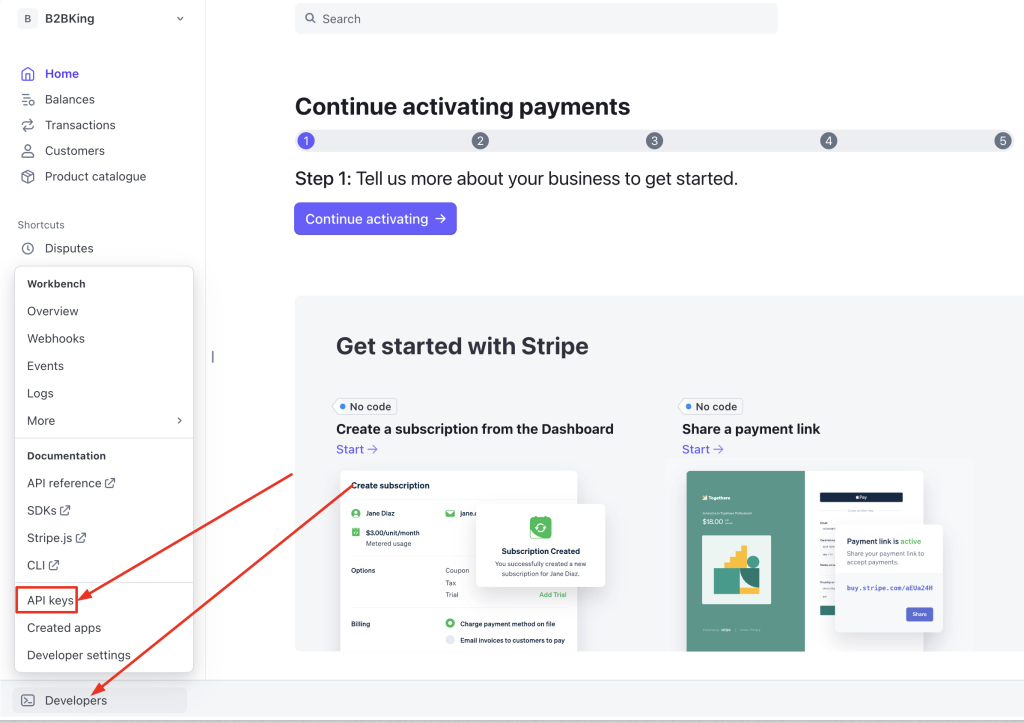
To get the API Keys, go to 'Developers' and then click on 'API keys' on the left sidebar:
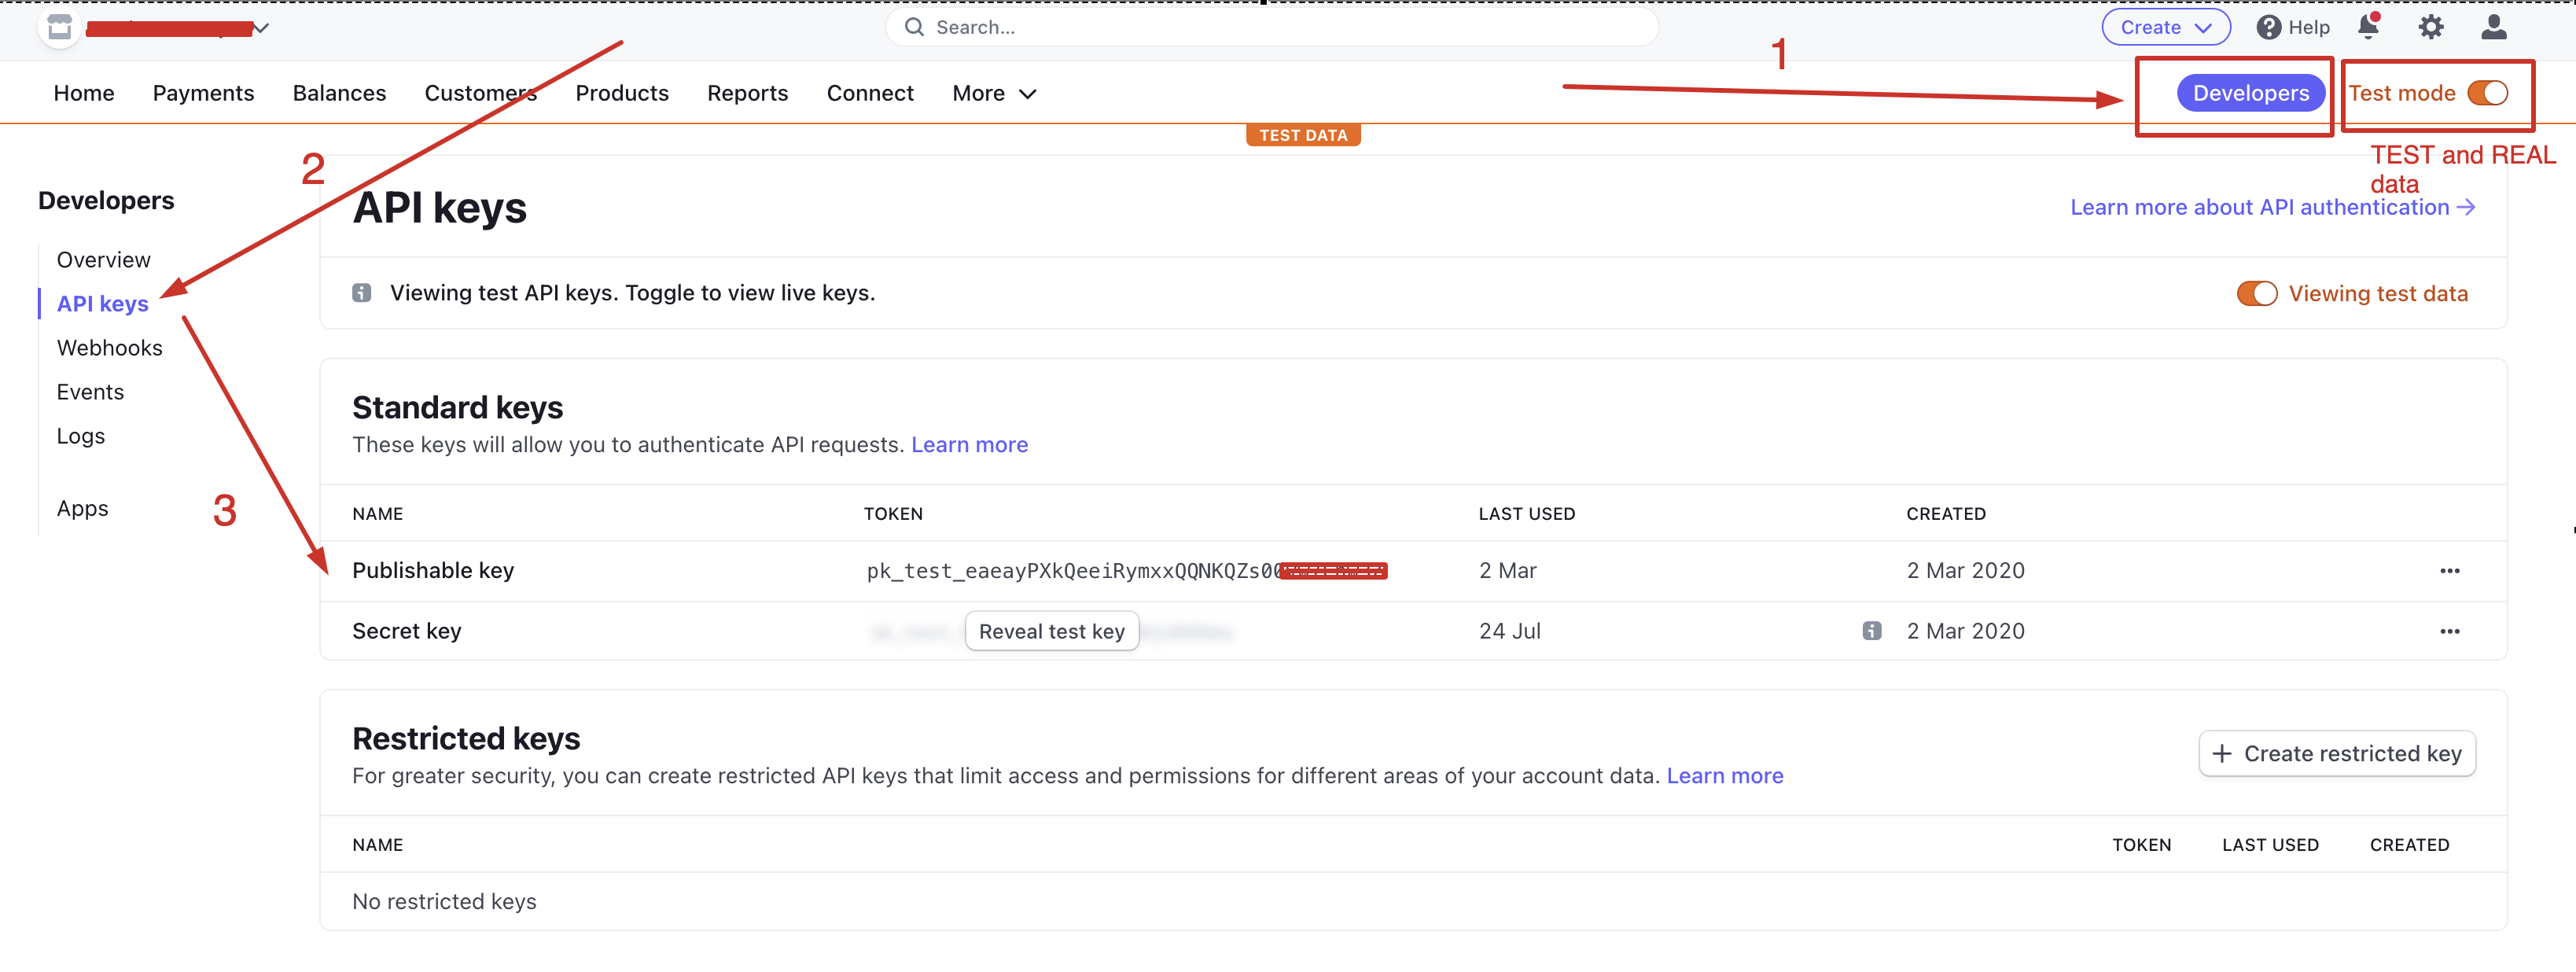
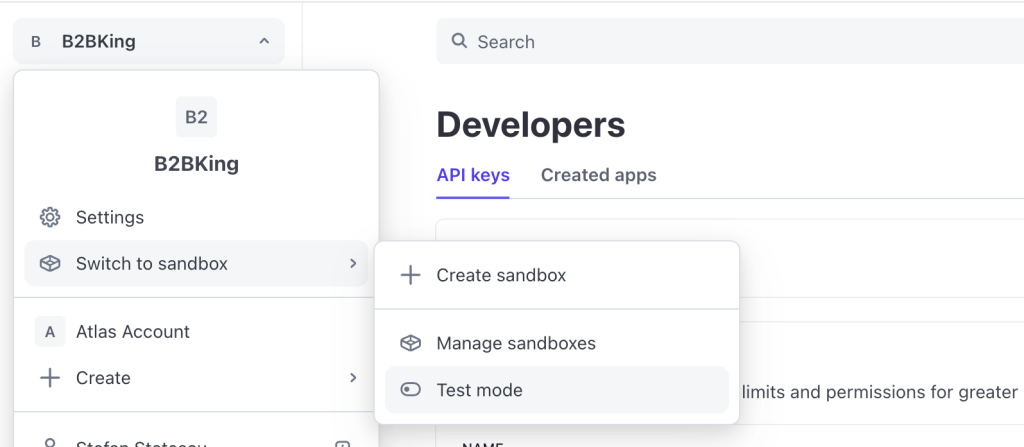
By toggling between the 'Test mode' button in the top right corner, you can switch between test and live API keys.
You will need to copy the Publishable key and the Secret key and paste them under Live credentials / Test credentials in the Stripe Connect gateways settings page (See above).
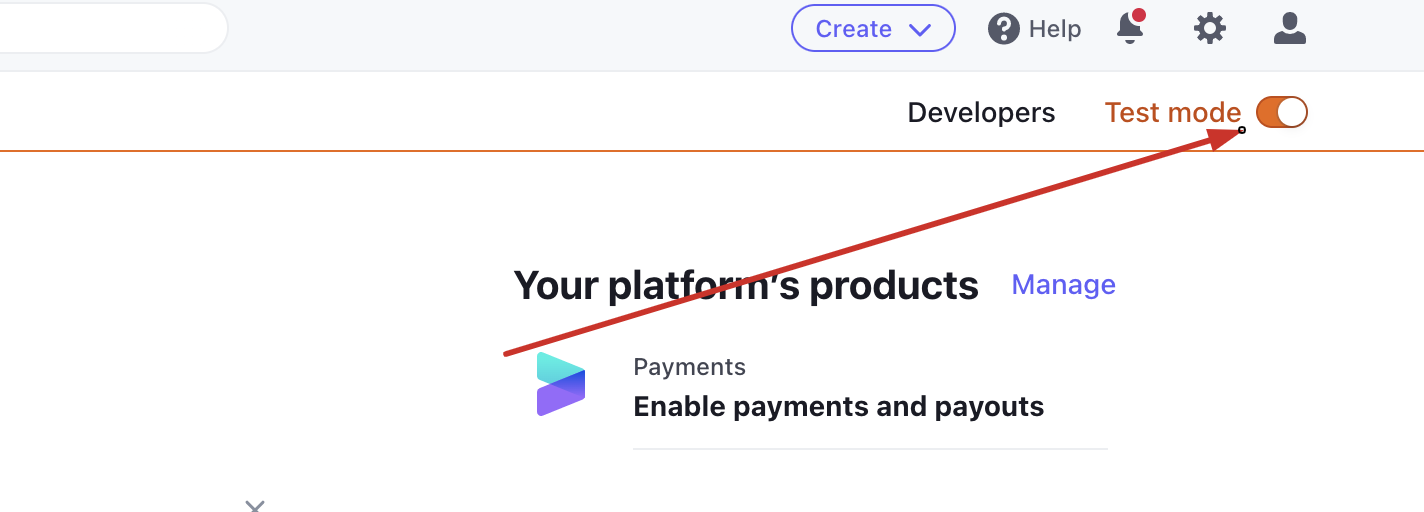
UPDATE 2025
Stripe has moved around some of these options. API keys can currently be accessed from the following menu:
Similarly test mode can now be toggled from the following panel:
If you are unable to find these or if it has changed location, refer to the API keys documentation: https://docs.stripe.com/keys
Enable OAuth, Client ID, Redirect URI
Additional settings must now be made.
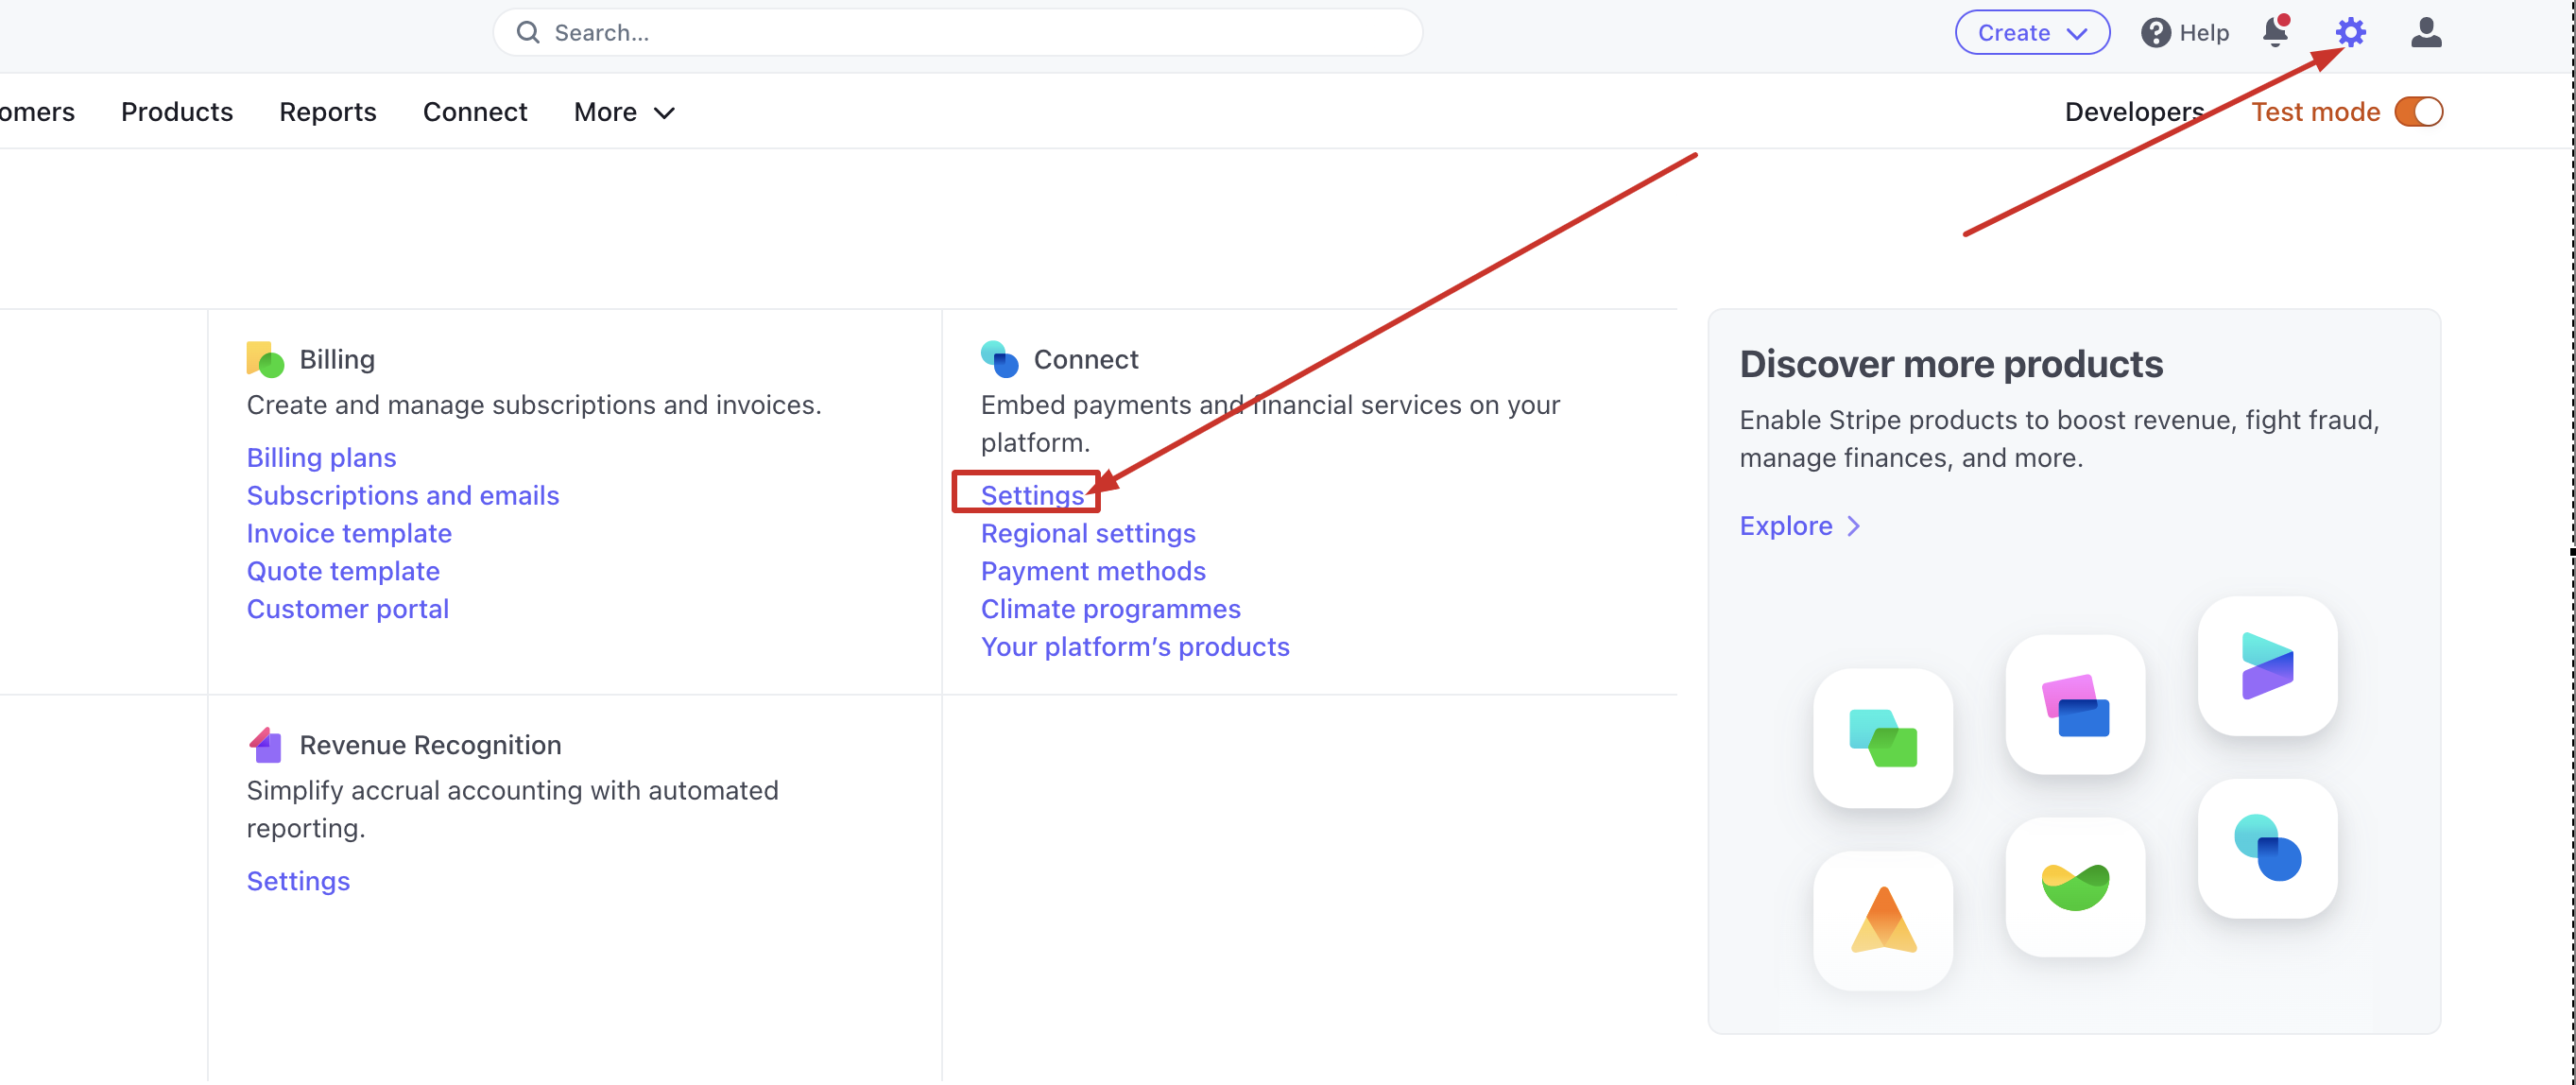
To do this, first click on the cogwheel Settings icon, and then on 'Settings' under 'Connect':
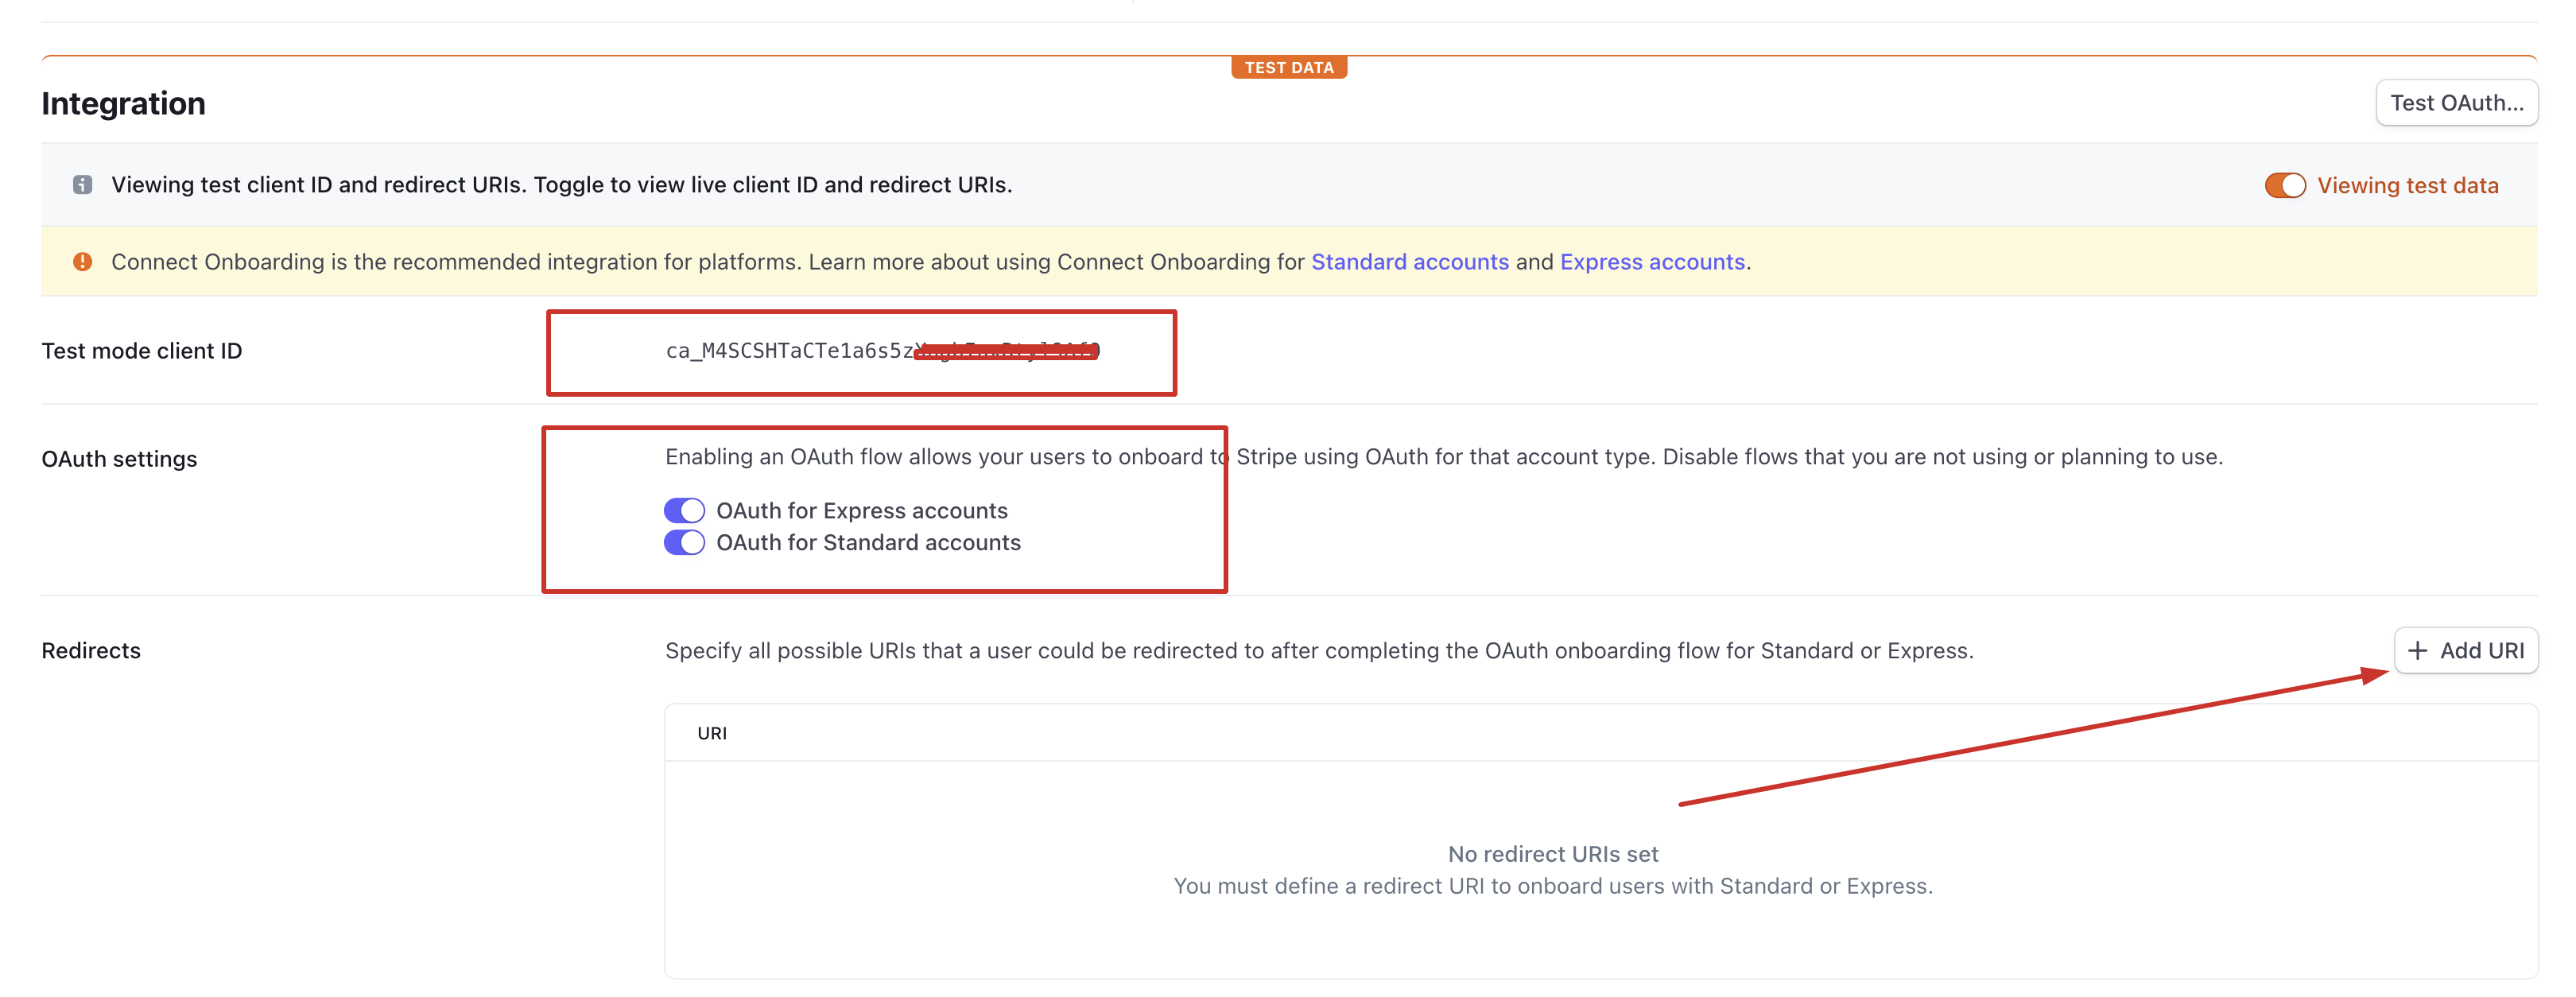
Now scroll down to Integration and you can see the client ID there. From there, copy the test client ID, and/or the live client ID and paste it under Stripe Connect gateway settings, as shown previously.
UPDATE 2025
Stripe has moved around some of these options. At the time of writing, this menu can be reached by clicking successively on Settings -> Connect -> Onboarding options -> OAuth:
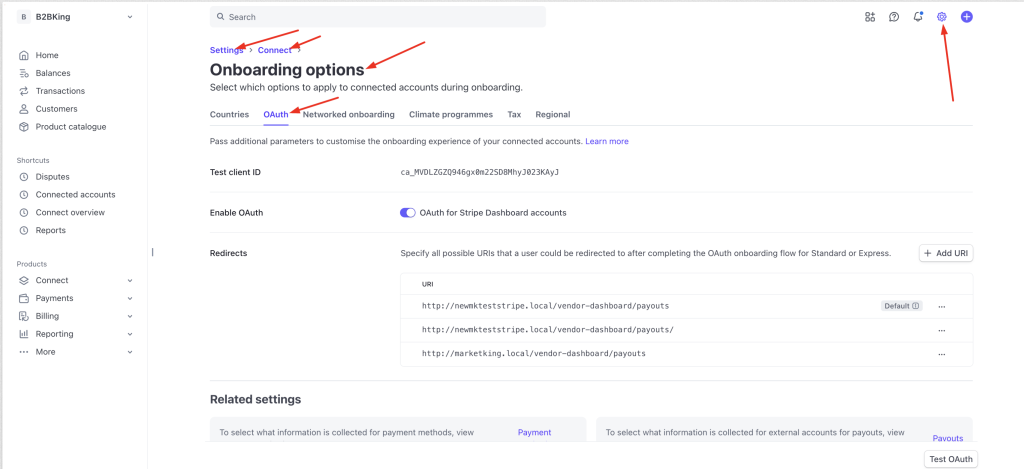
You must enable OAuth for your vendors to be able to connect their accounts. You will see 2 'OAuth' switches, as visible in the above image. You should enable both.
Finally, you must set the redirect URI. This must be your vendor dashboard -> payouts link. This is usually https://yoursite.com/vendor-dashboard/payouts . You should use HTTPS, but HTTP can also be used if you're using test mode (as we are using below).

We recommend you enter it both with "/" and without "/" at the end:

If you see an error such as "Invalid request: Invalid redirect URI" when trying to connect, make sure to add both options.
This is the address where your vendors will be redirected to after connecting their accounts, and it's important to set it to your dashboard payouts page, so that MarketKing can finish connecting the vendor account.
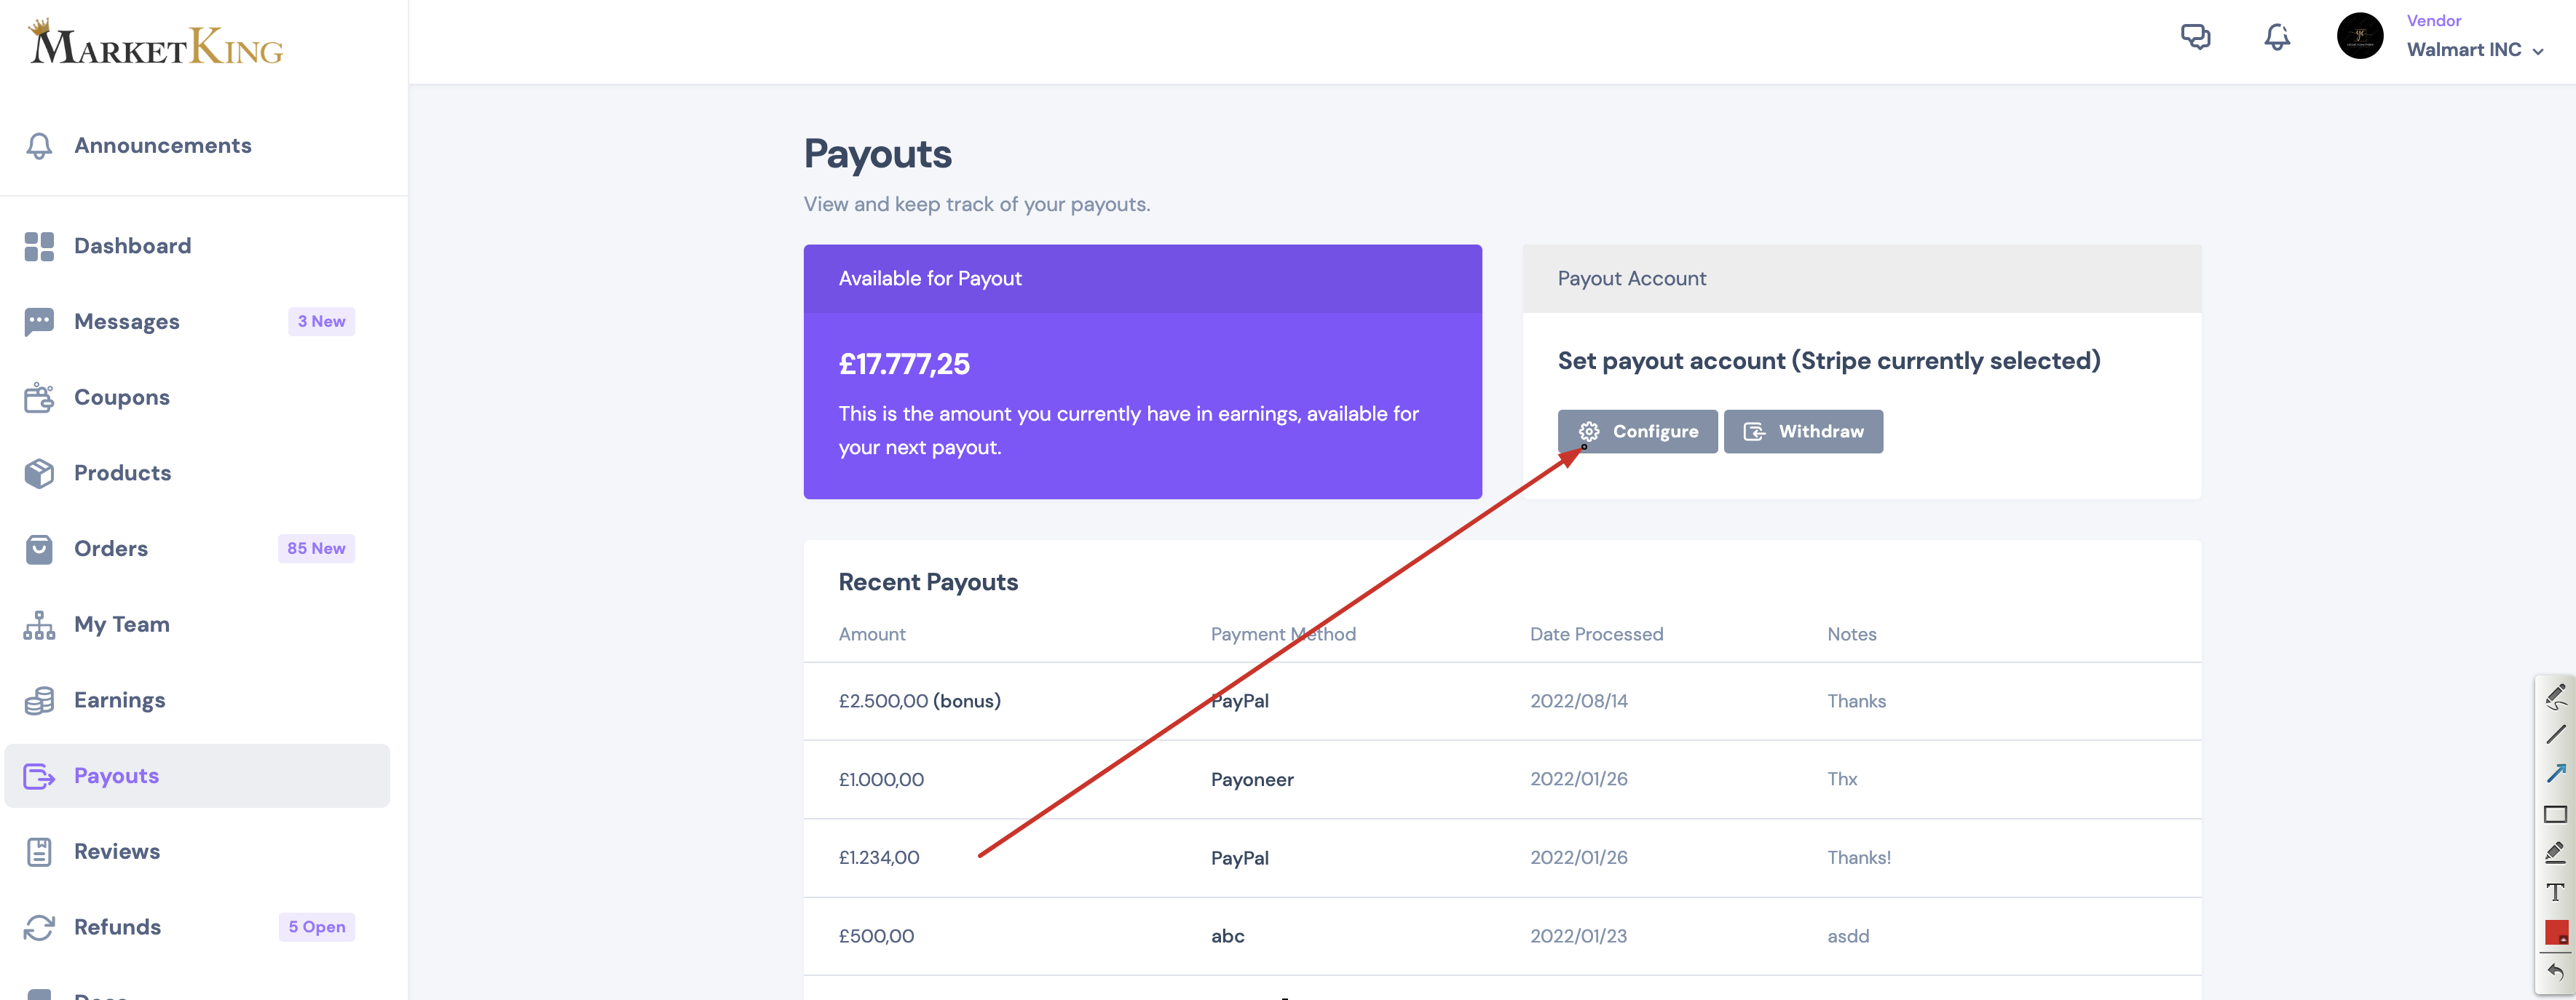
How Vendors Can Connect Their Accounts
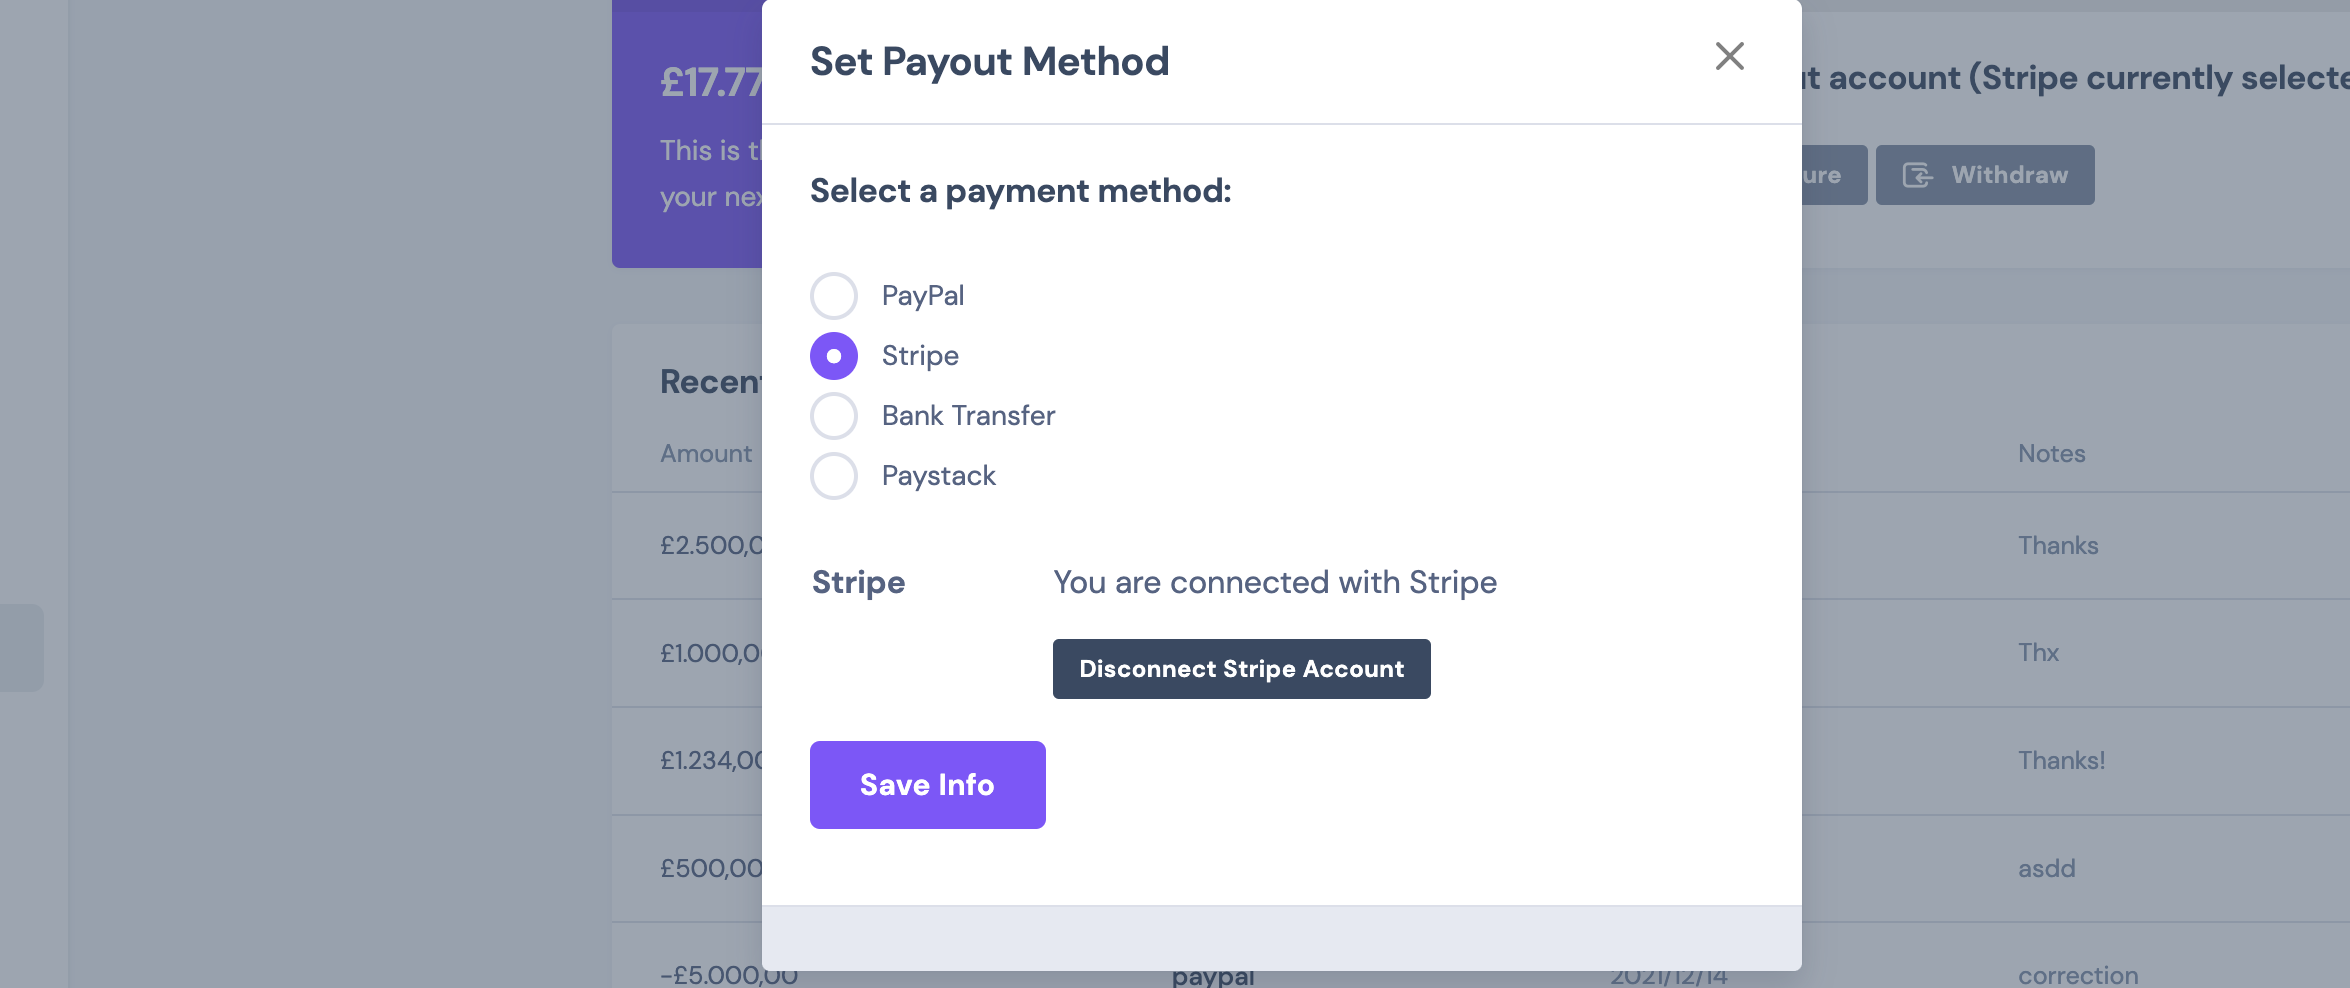
To connect their accounts, vendors will login to their vendor dashboard and go to Payouts and click on 'Configure':
Vendors will then click on the 'Connect with Stripe' button:
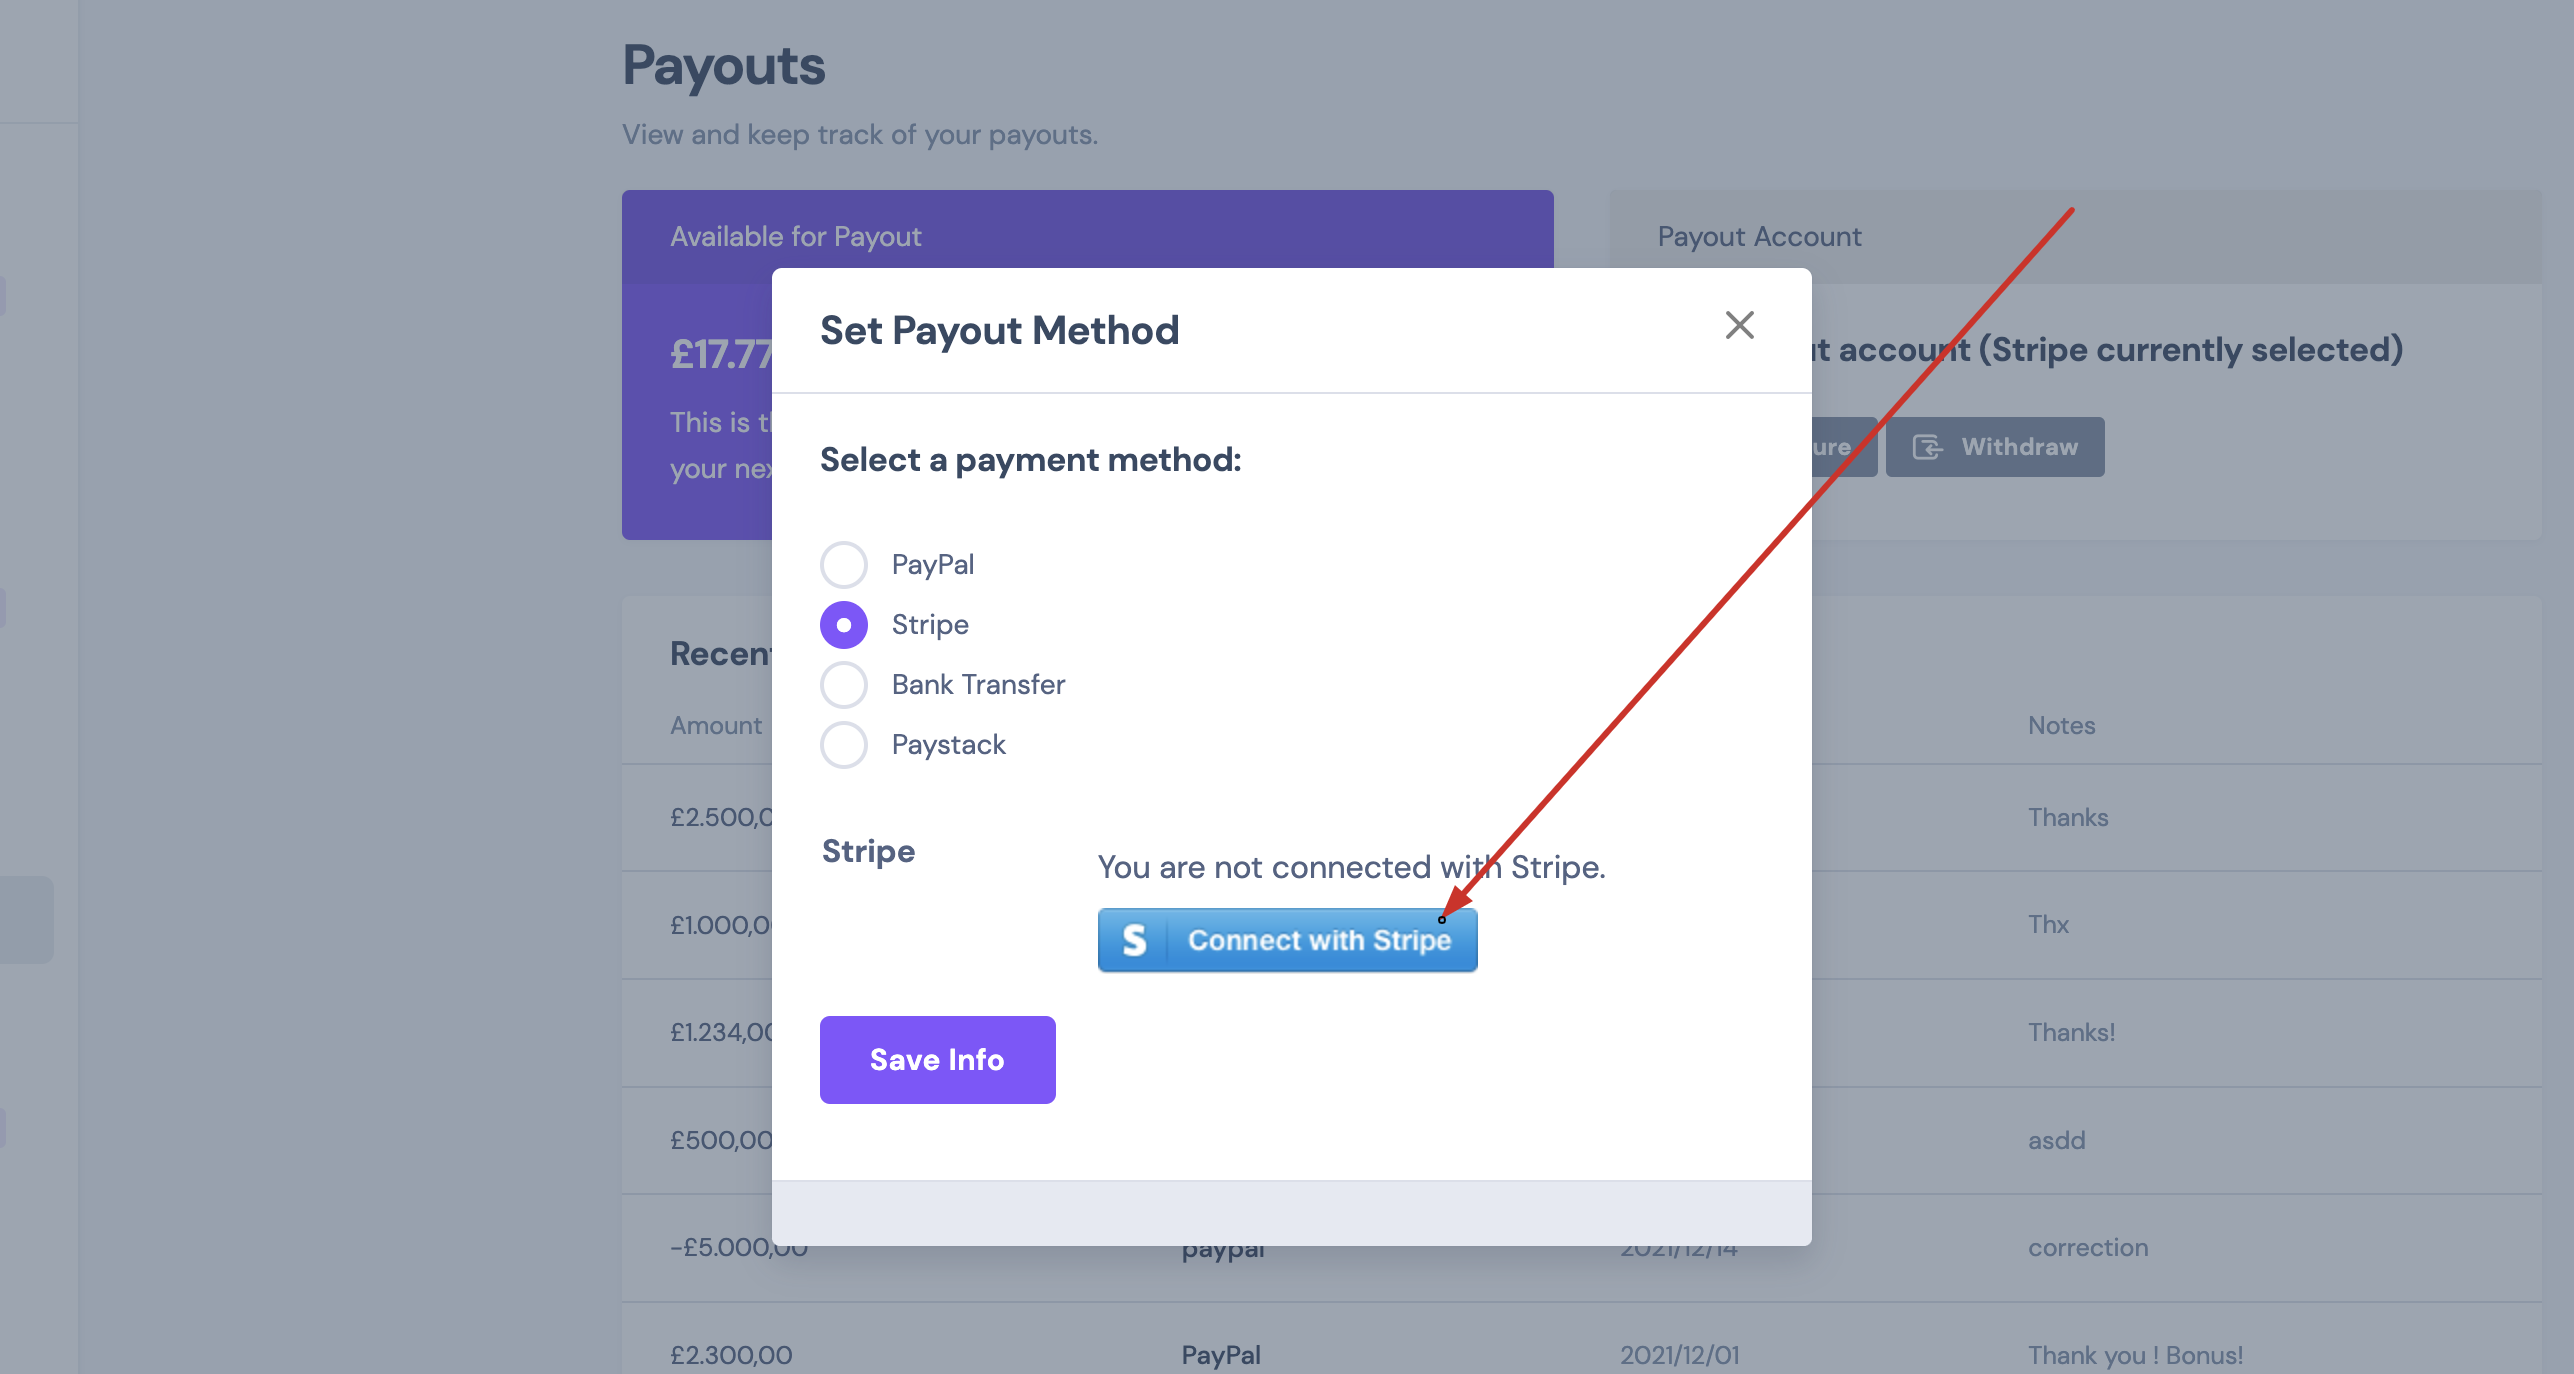
Now vendors will be redirected to a Stripe page where they can connect their account or sign up for a Stripe account.
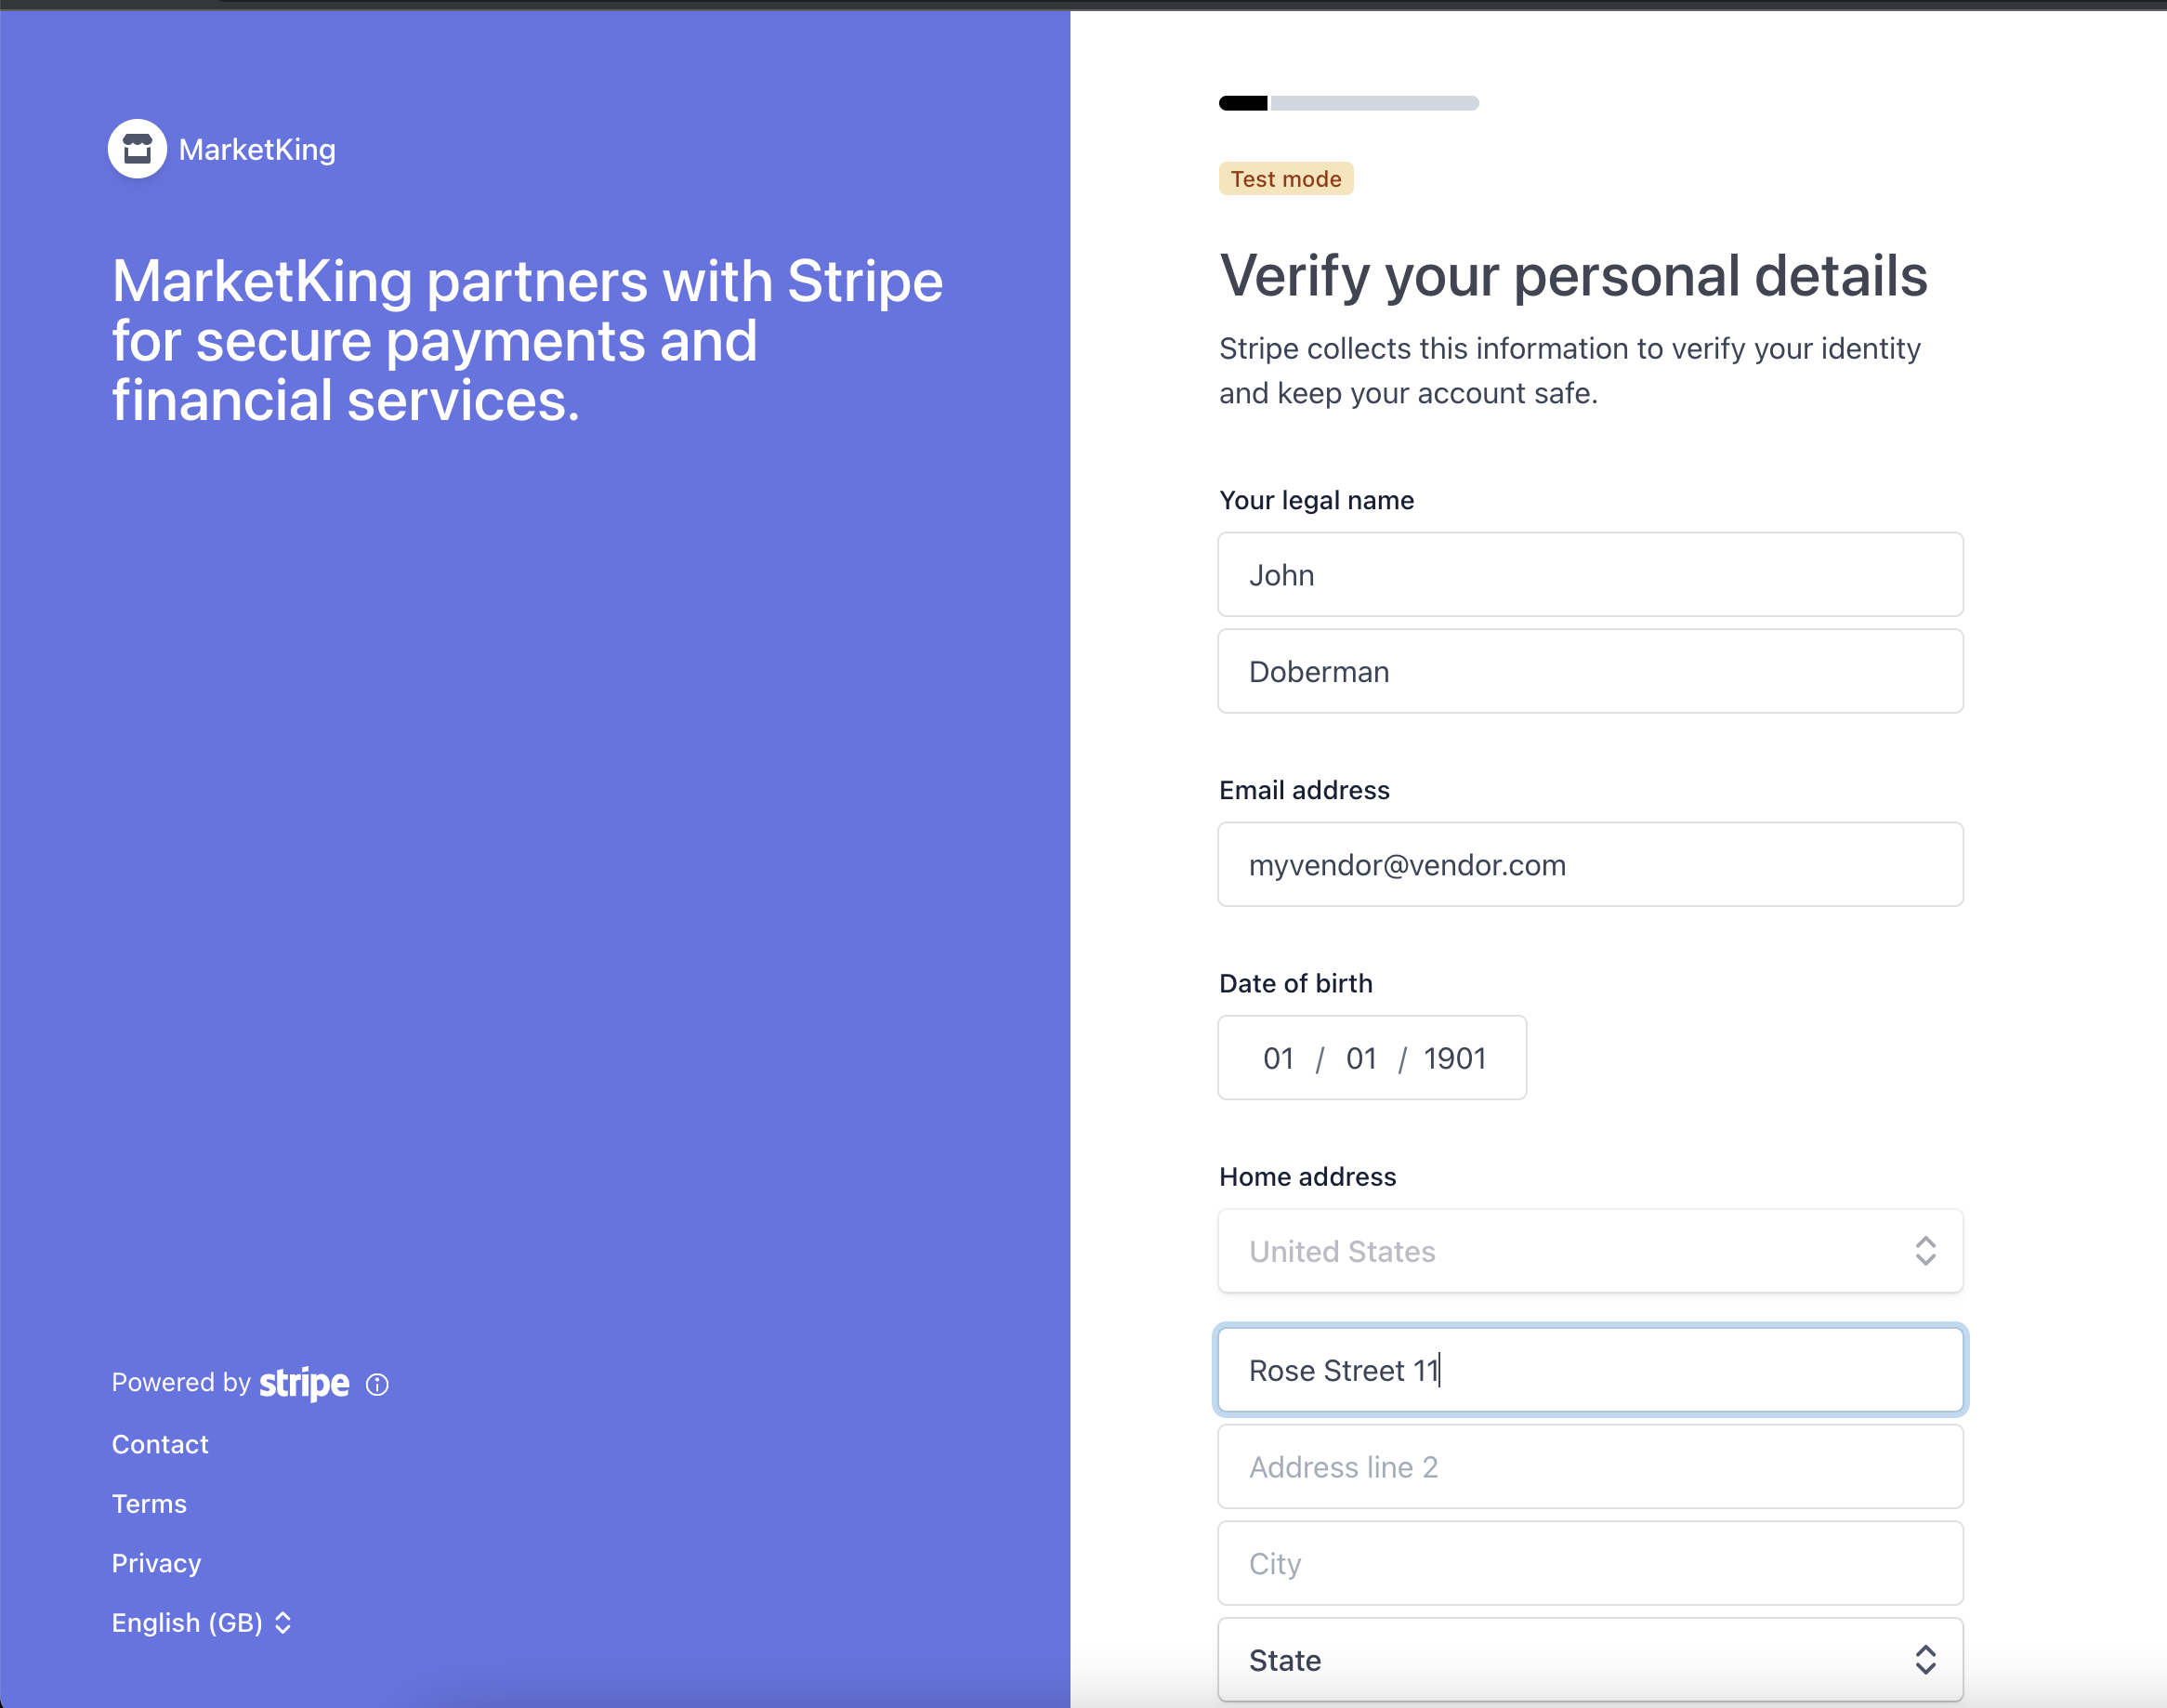
Important when using test mode:
You should choose the date of birth to be 01 / 01 / 1901 - this triggers the 'verified' status for the vendor account.
Other values will allow you to test other scenarios such as unsuccessful verification or an OFAC alert -> see https://stripe.com/docs/connect/testing for more info.
Finally, once the vendor has connected their account, they will be redirected to the vendor dashboard and will see a 'success' message:
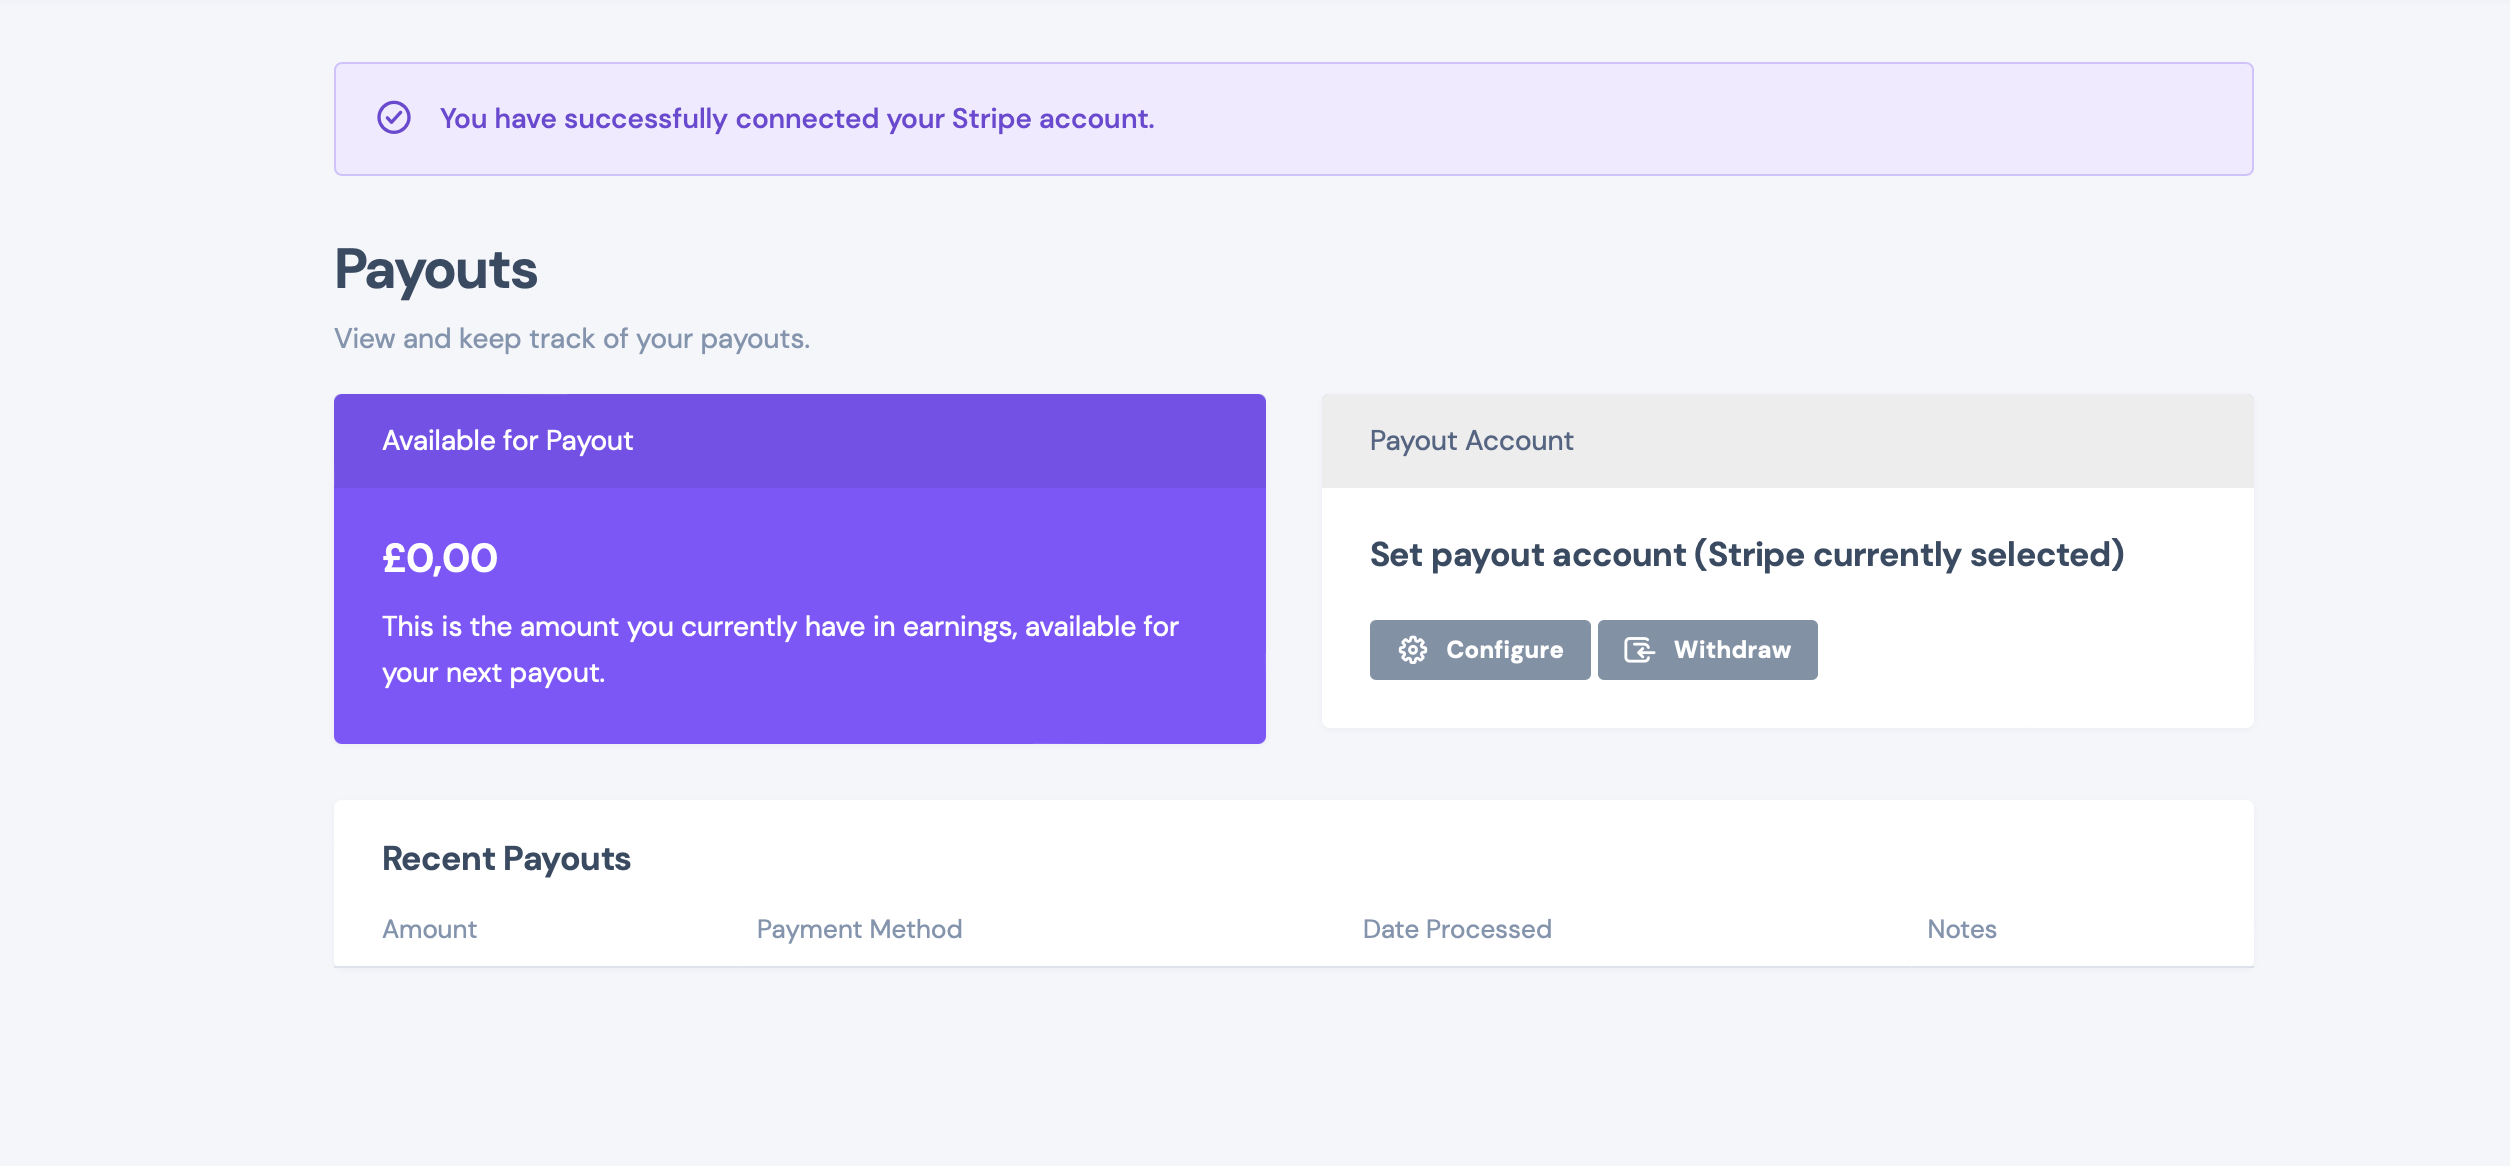
To disconnect, the vendor can go to the same 'Configure' panel and click on 'Disconnect Stripe Account':
Earnings and Payouts when using Stripe Connect
When using Stripe Connect, commissions are sent to vendors automatically, so there's no need to make manual Payouts. Everything is handled automatically without admin intervention.
When vendors go to their Earnings page, they will see it as follows:
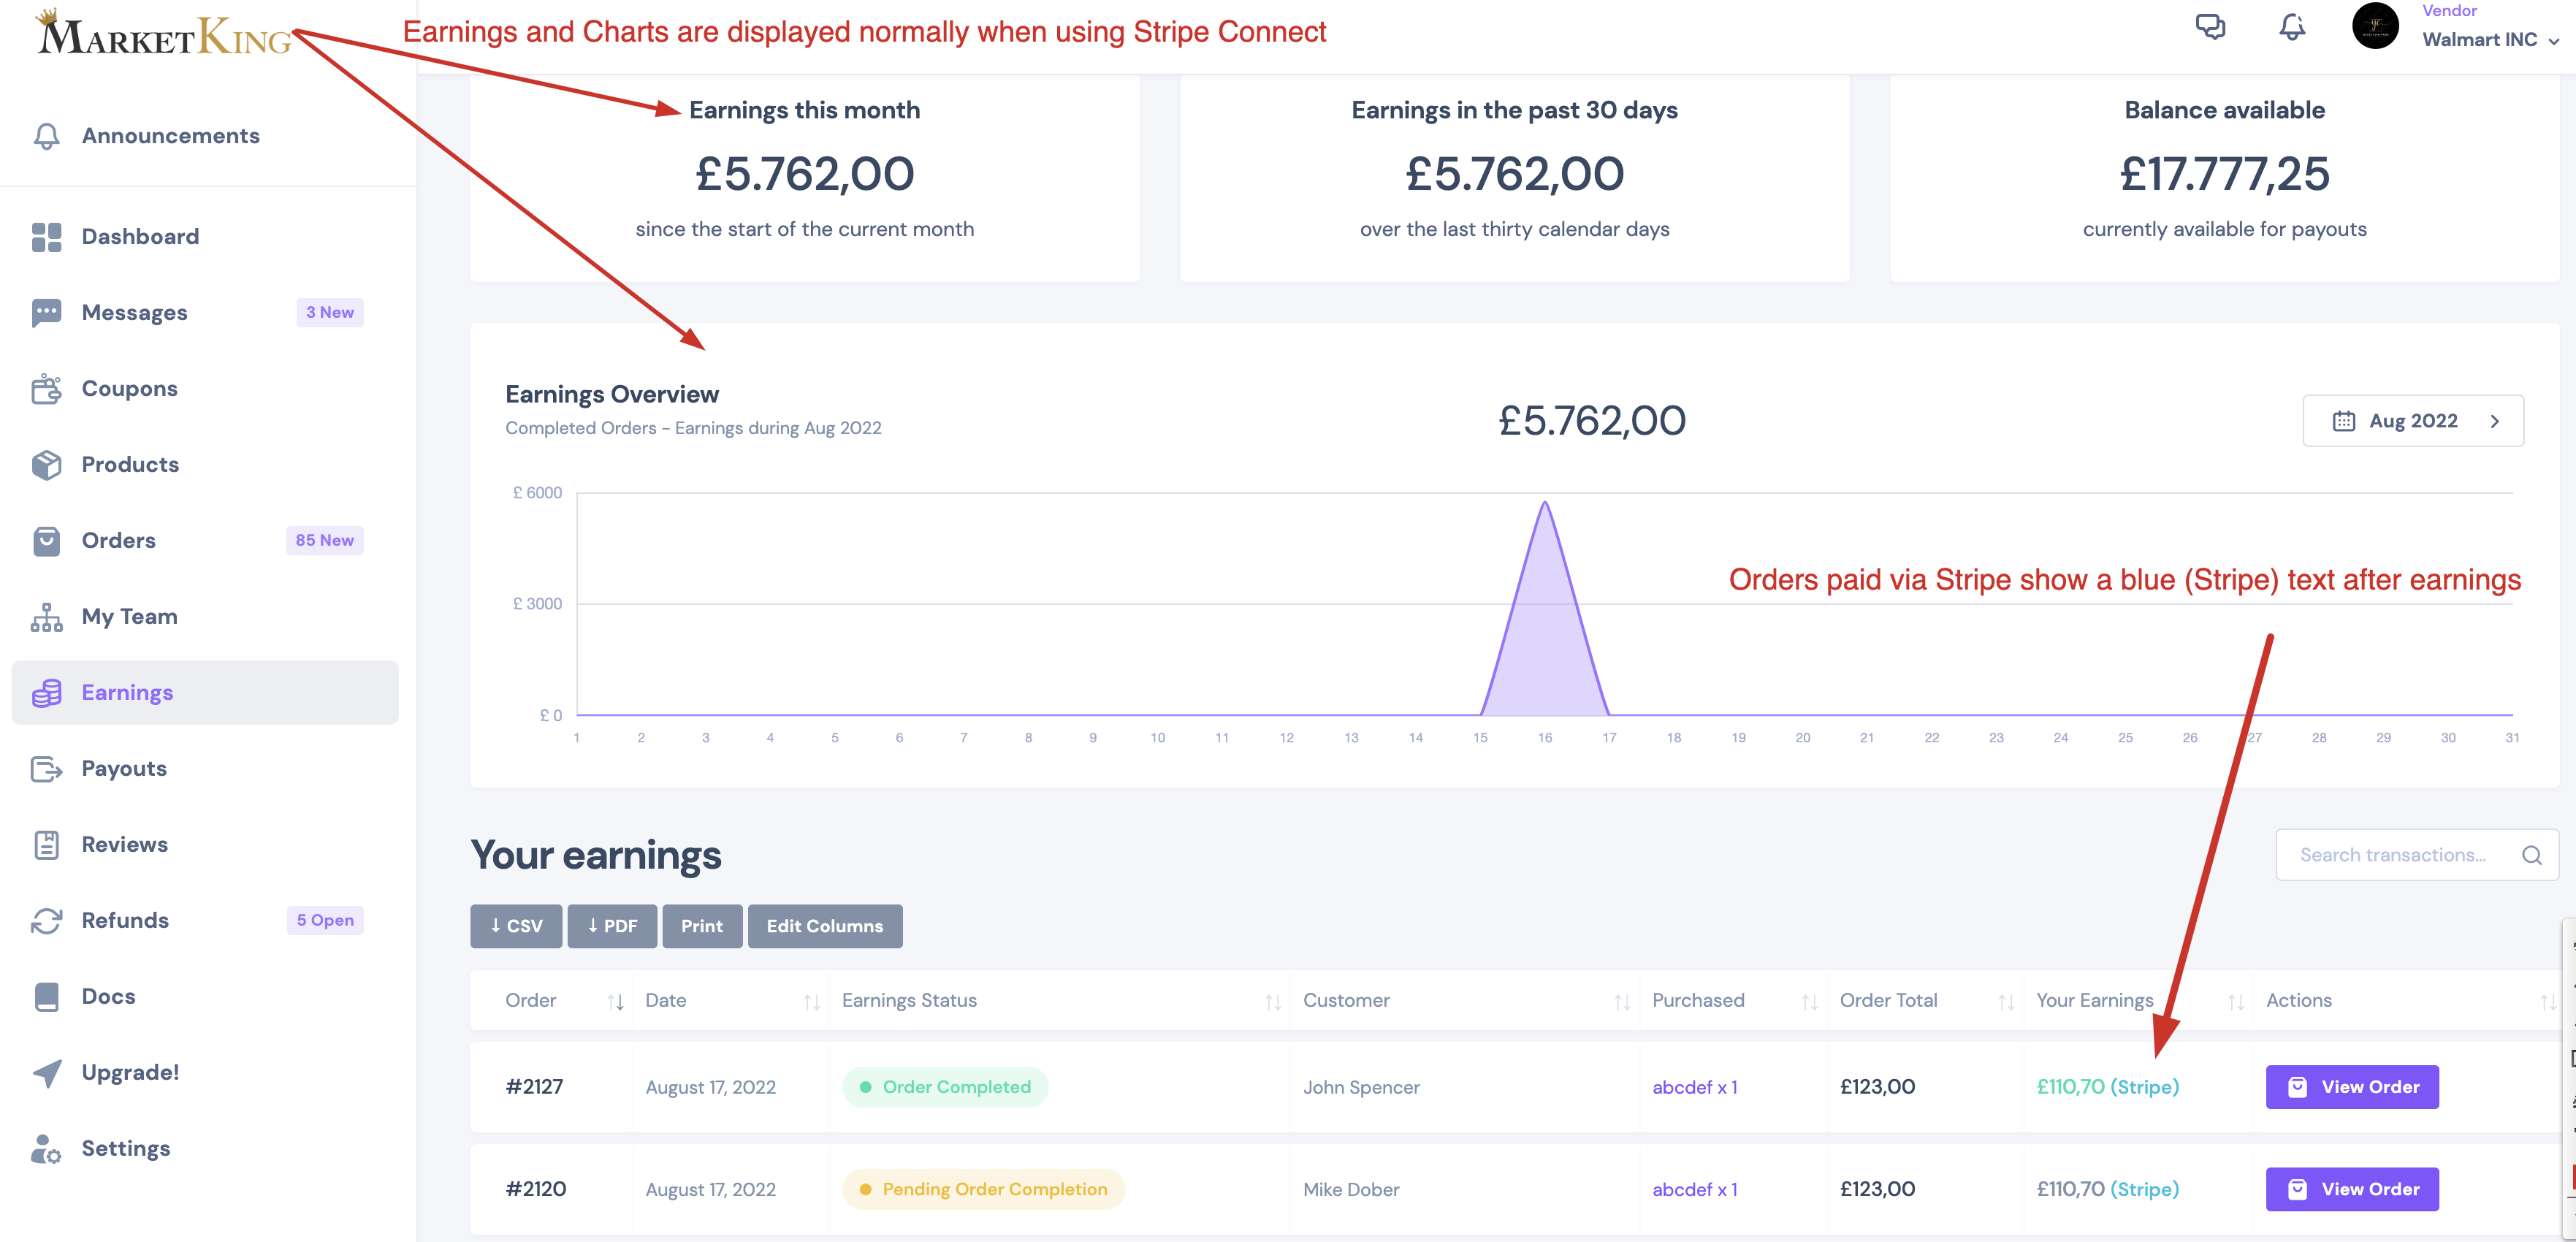
- Earnings and Charts will display normally, as with any other payment method.
- Please note that Earnings / Charts only update after orders are set to the 'Completed' status.
- The 'Balance' of the vendor never changes for Stripe orders, because the balance represents the amount the admin owes the vendor.
- Orders paid via Stripe will have a blue "(Stripe)" text after earnings.
How Charges and Payments are displayed on the Stripe Dashboard
On the admin's Stripe dashboard page, charges and payments are displayed differently depending on whether you're using Direct Charges, Destination Charges, or 3D Secure (Transfer Charges).
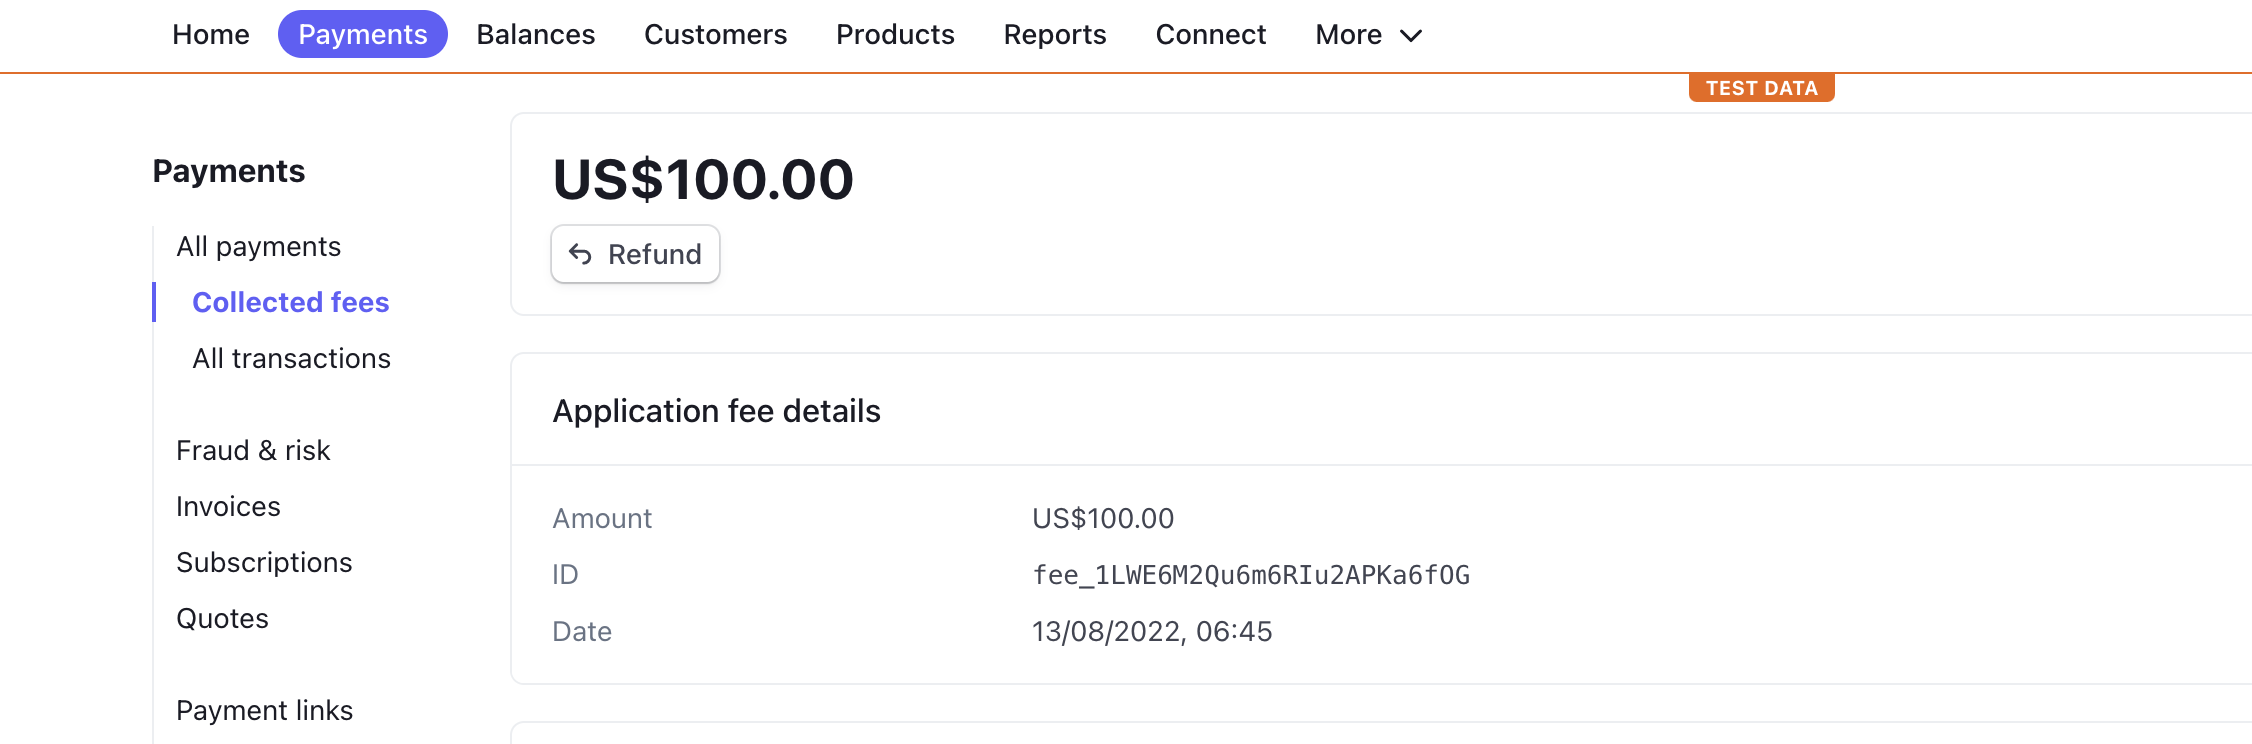
When using Direct Charges, the vendor will see 2 separate fees for their orders
- Stripe processing fees
- Application fees (this is the admin commission that is paid to the admin account)
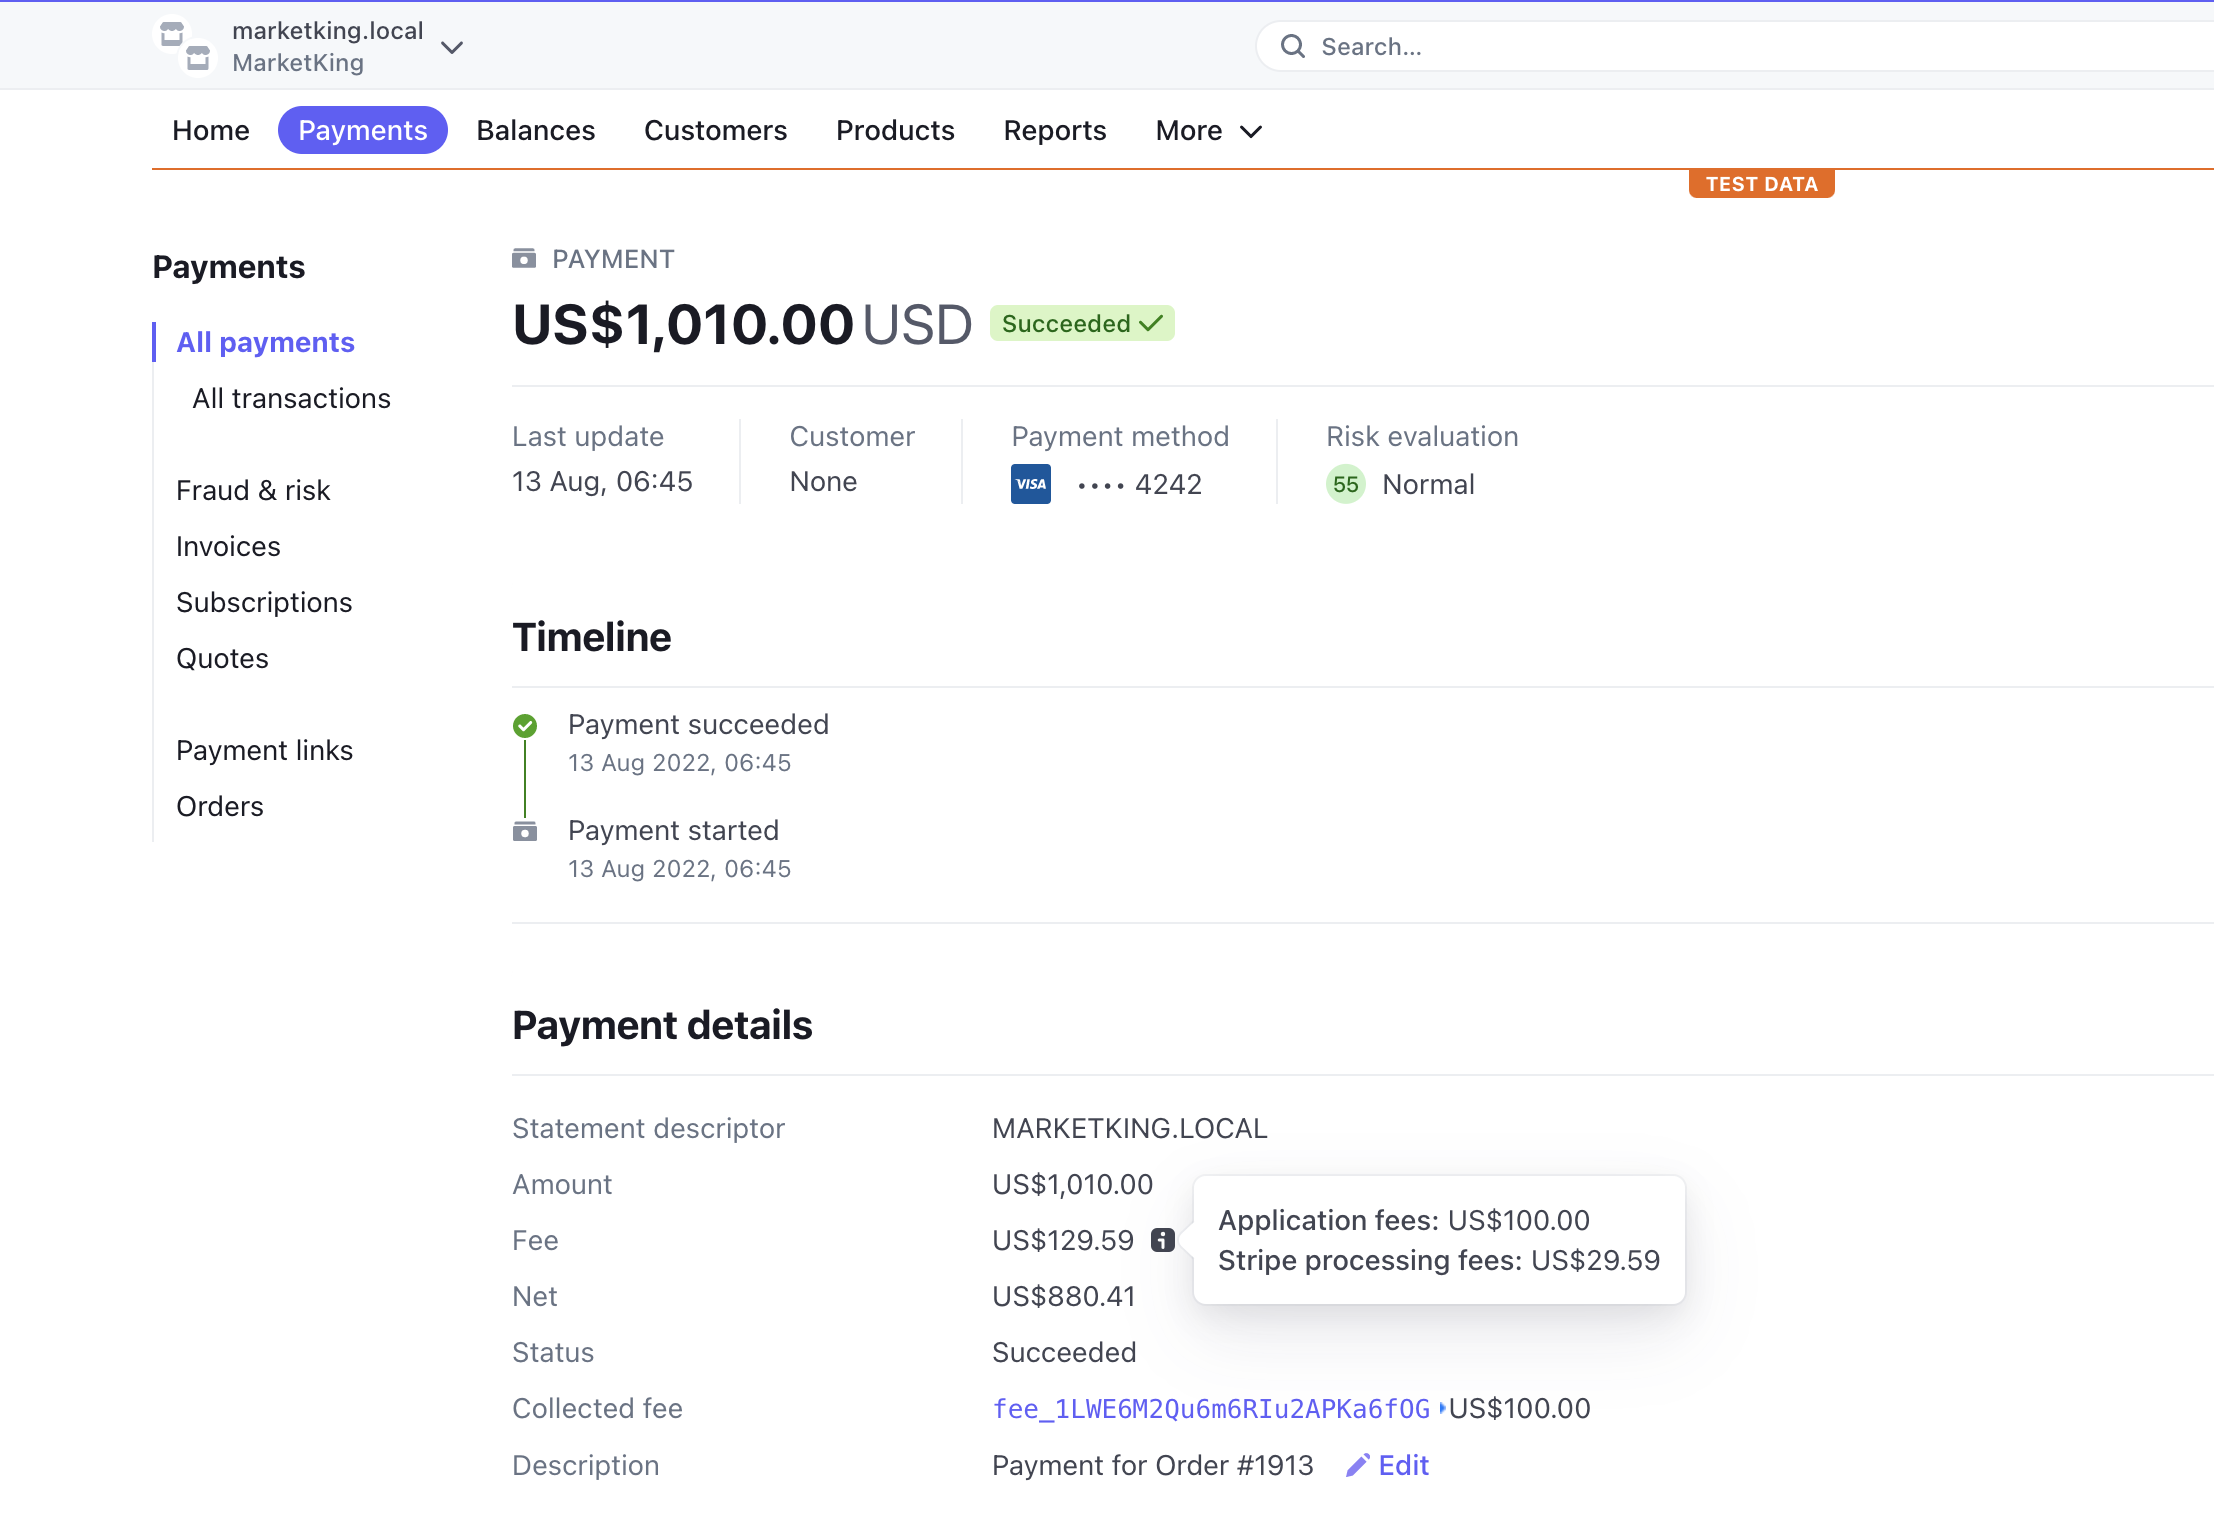
In the above example we have a $1000 order with a $10 shipping cost and a 10% admin commission. The application fee (admin commission) is $100, and Stripe's processing fees are $29.59 (calculated automatically by Stripe).
The admin will see this under Payments -> Collected fees:
When using Destination charges or 3D Secure mode, rather than collecting 'application fees' from vendors, the admin receives the entire amount of the transaction, and then an automatic transfer is made to the vendor.
For a $1000 order with a 10% commission rate, the admin will see the following:
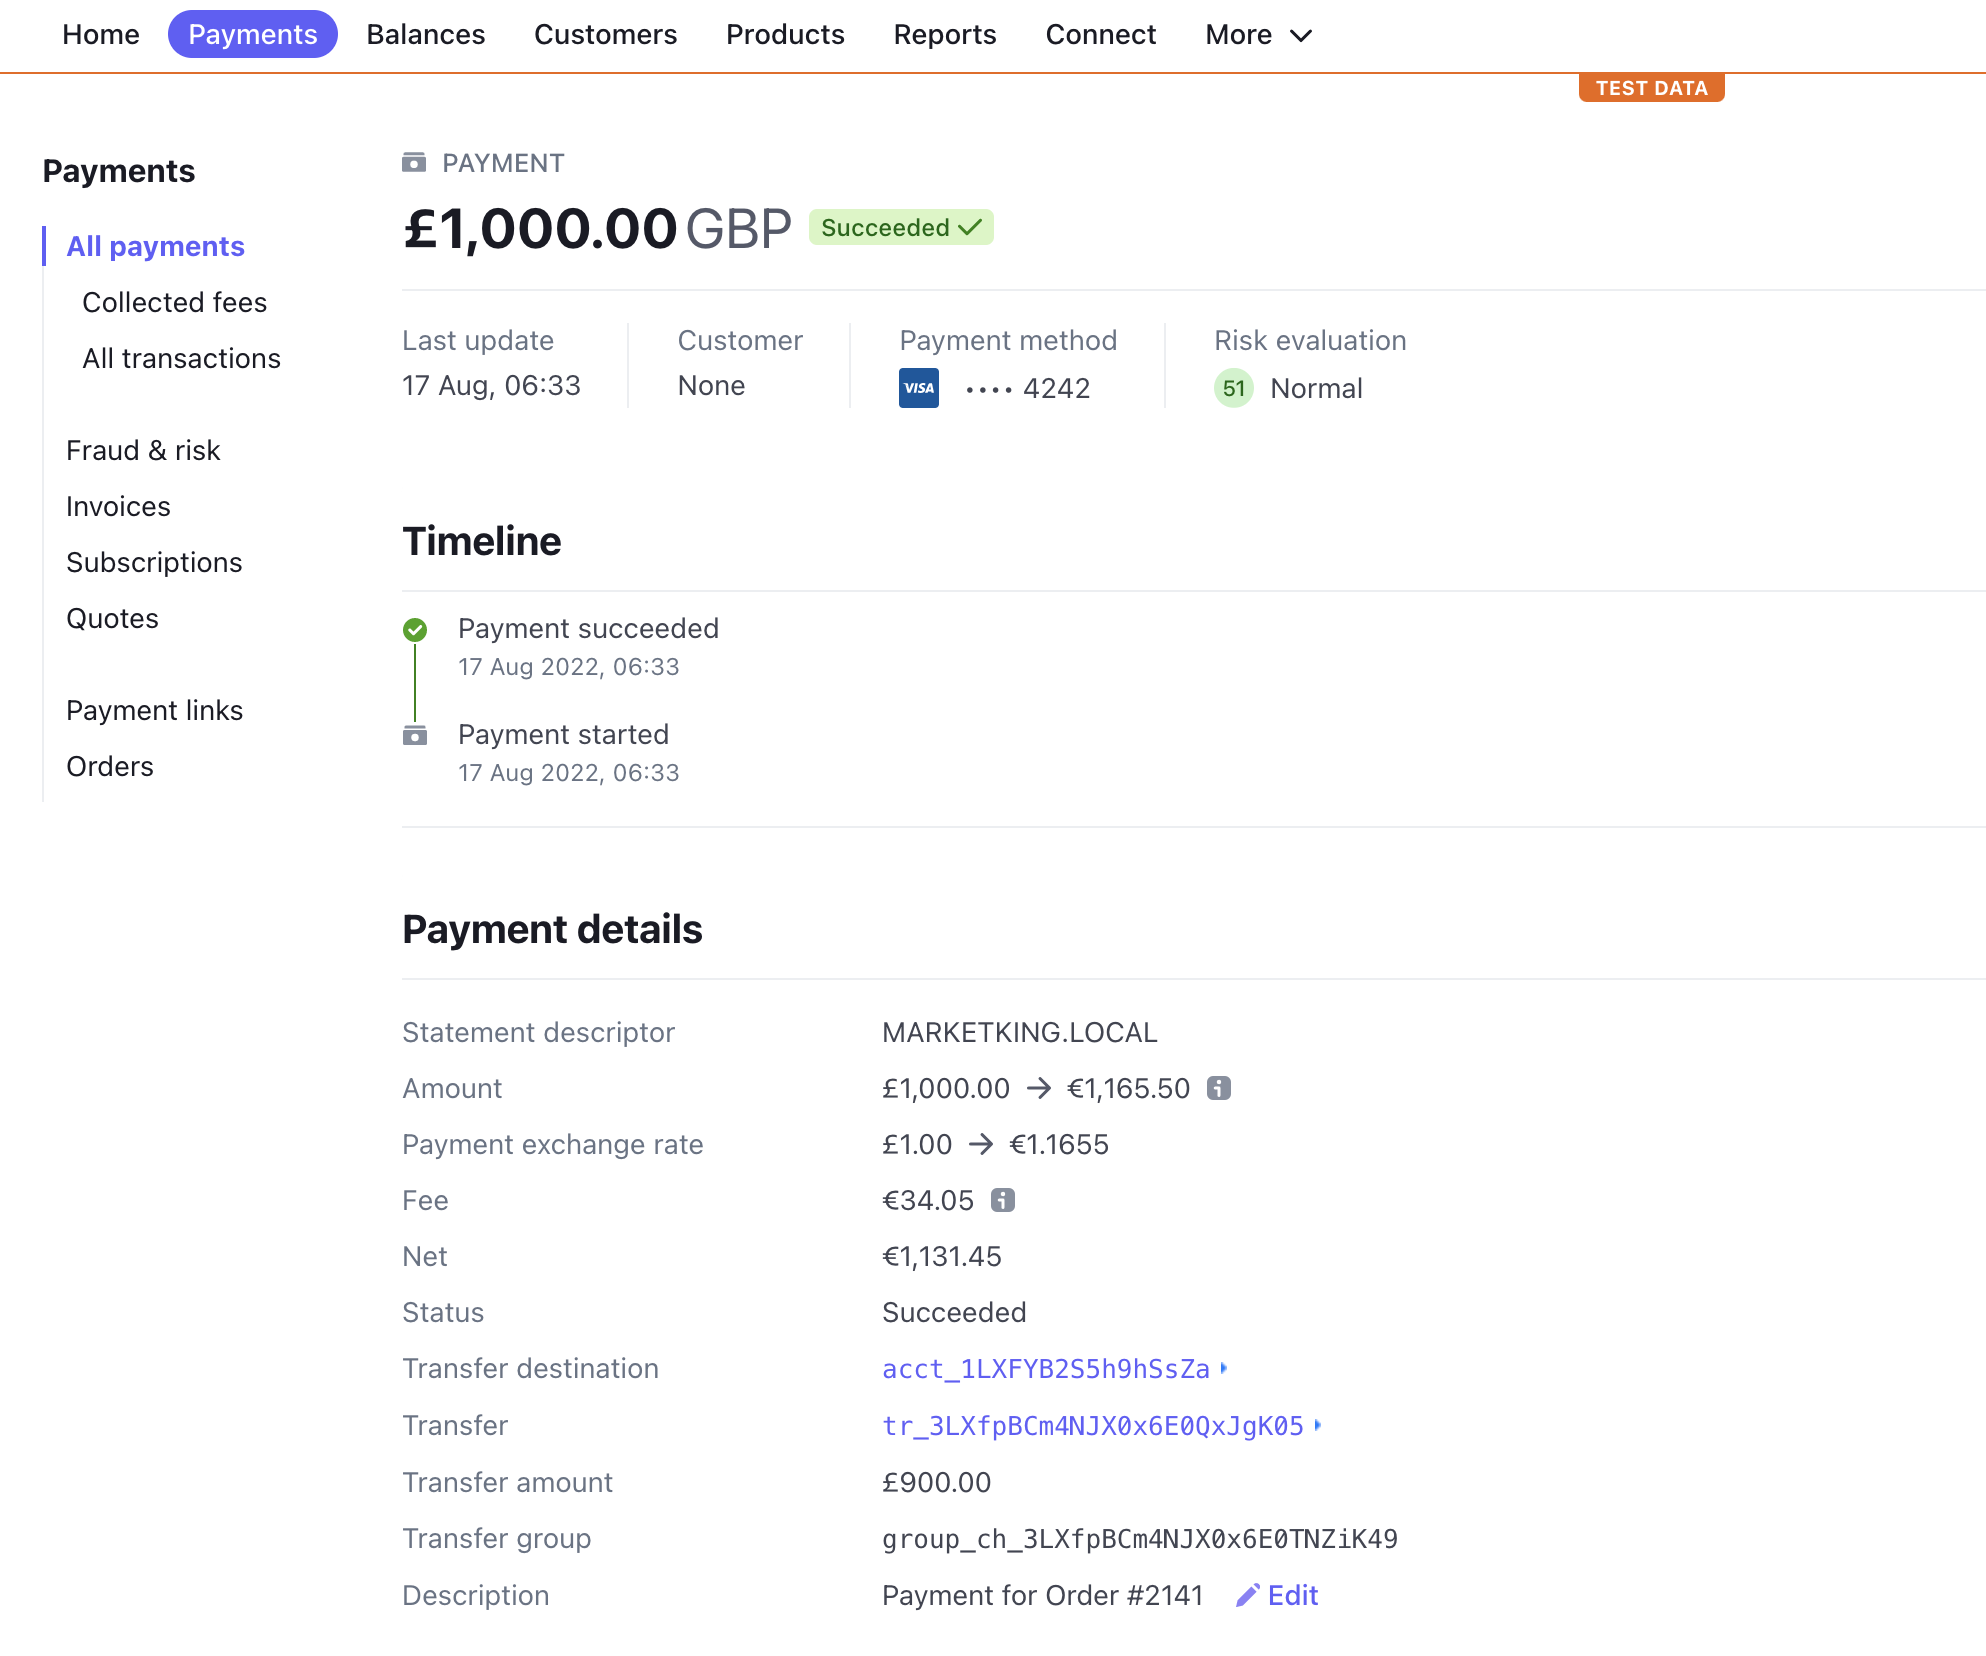
The admin sees the entire amount of $1000, as well as a $900 'Transfer amount'.
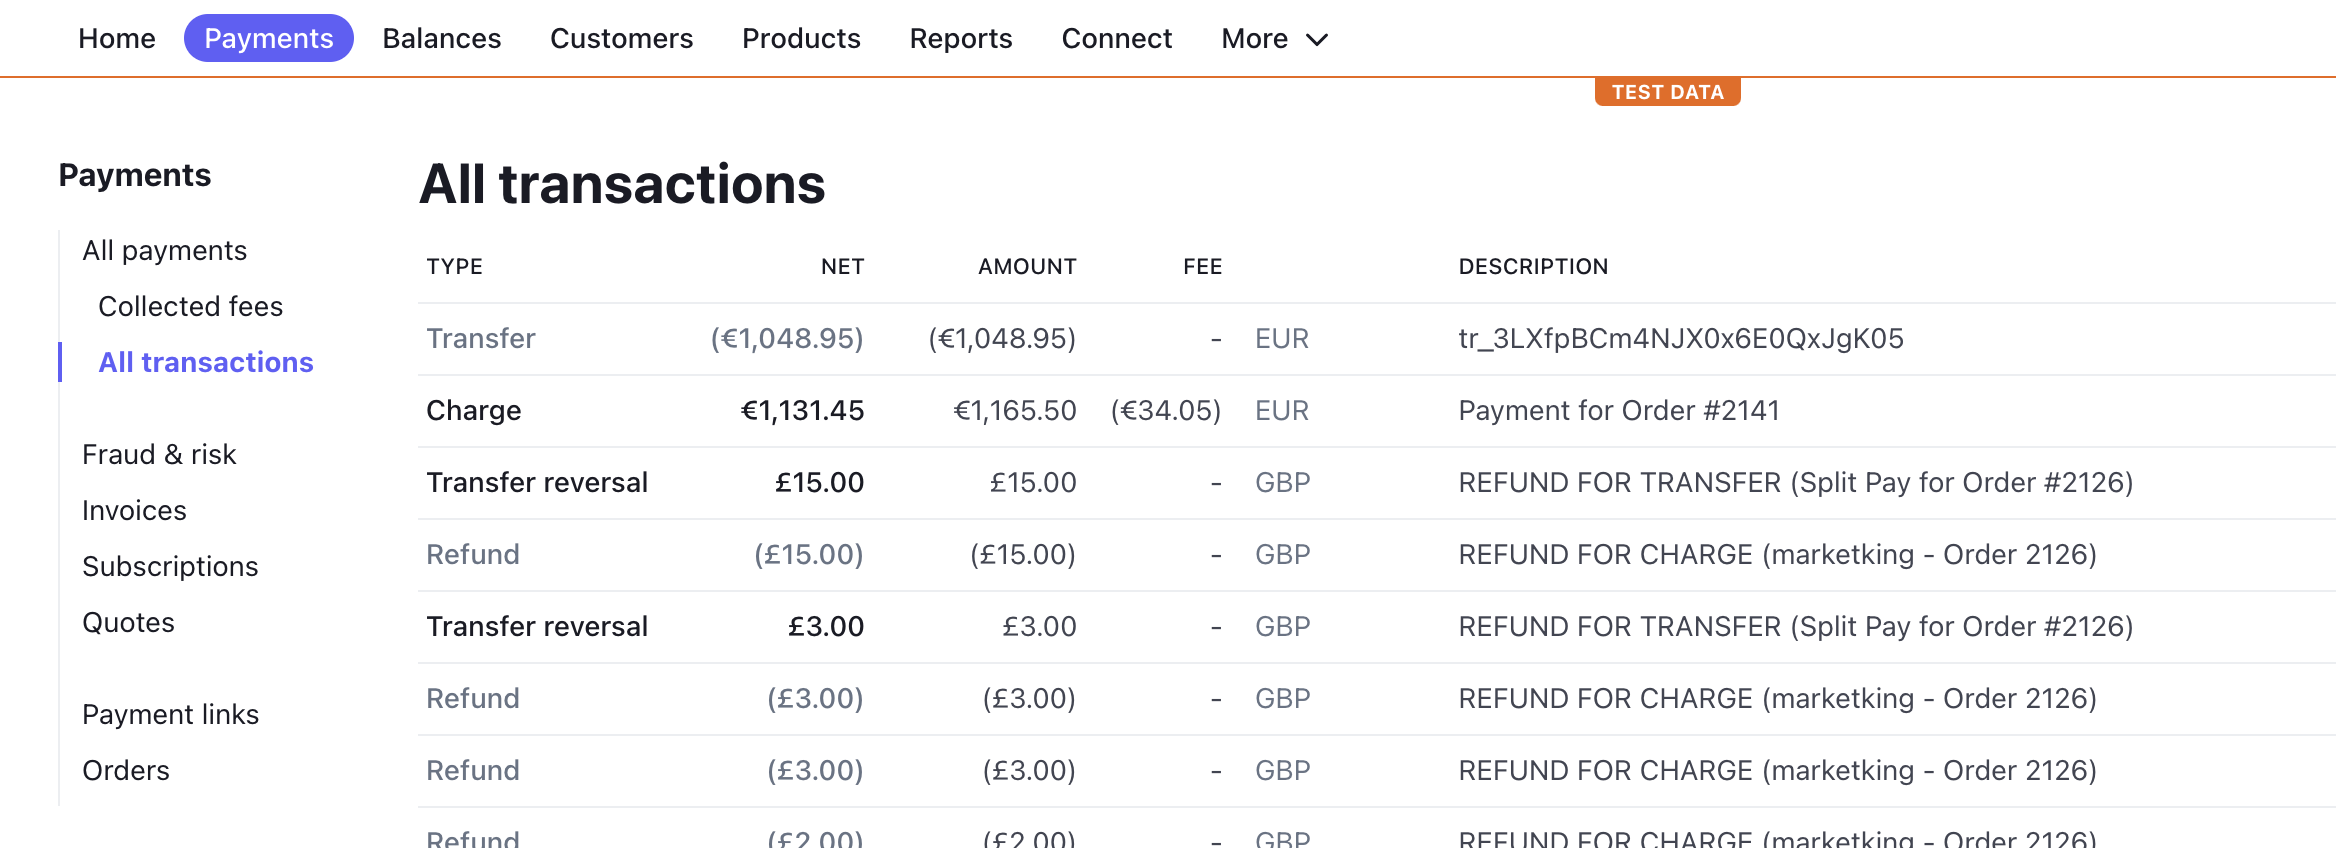
The admin can see a full history of transactions, transfers and refunds under Payments -> All transactions:
How Automatic Refunds Work
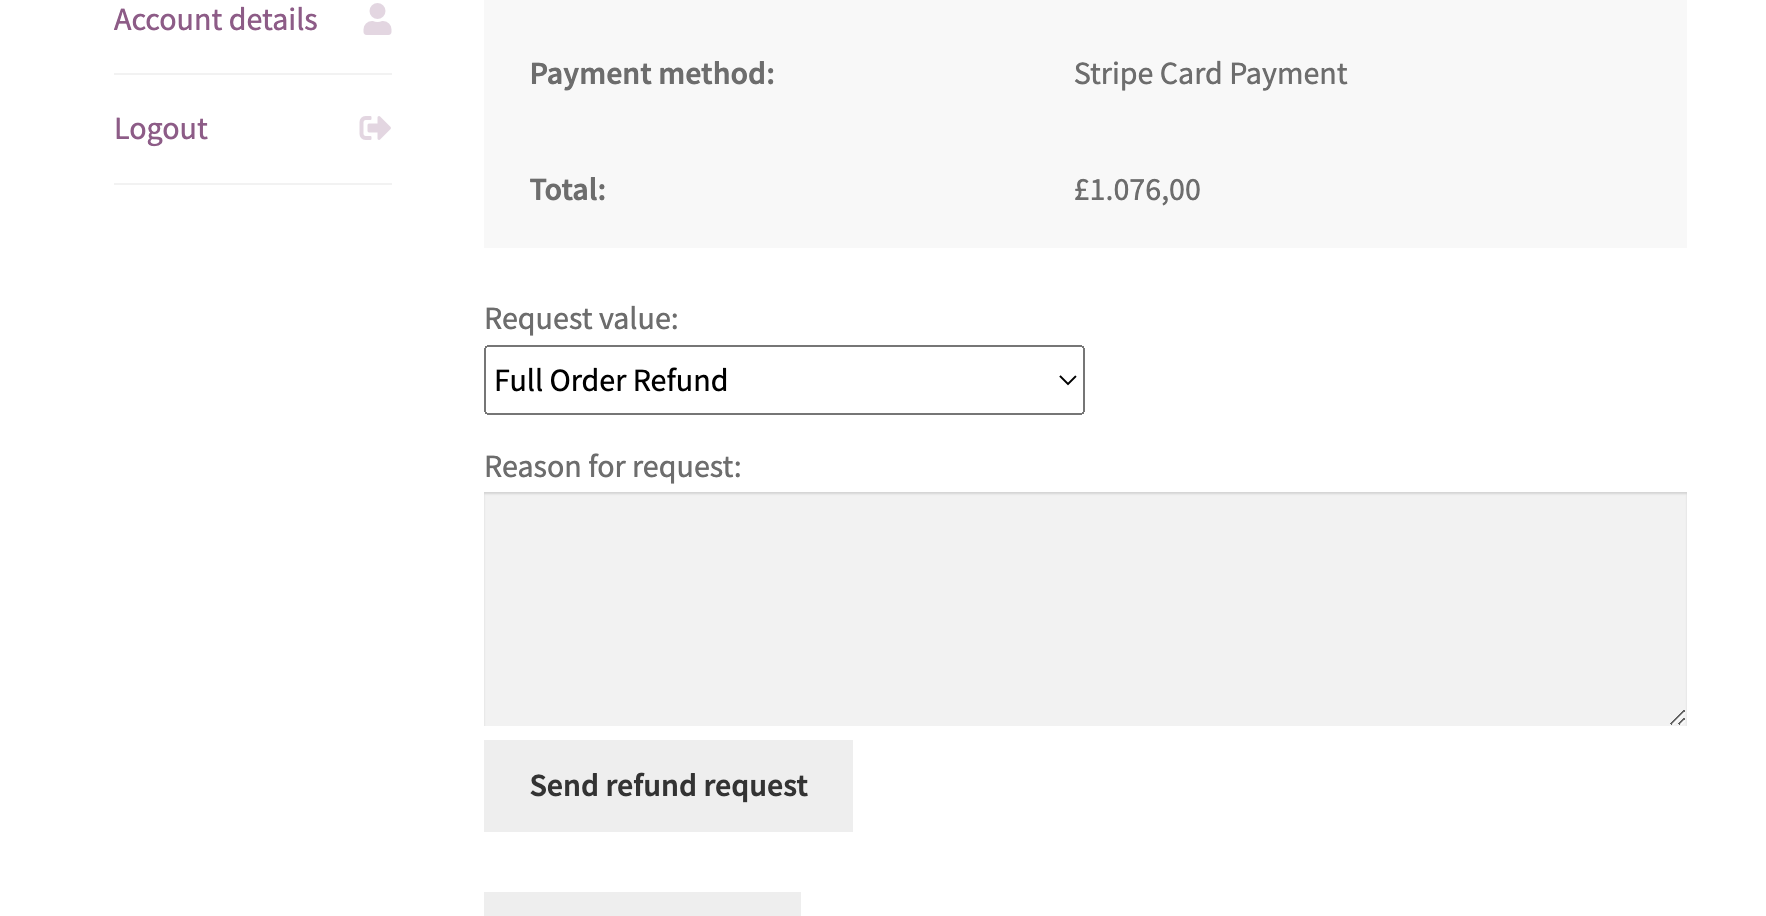
As mentioned in the Refunds documentation, customers can request refunds under My Account -> Orders:
After a refund has been requested vendors can open a refund through their dashboard and click on 'Approve refund':
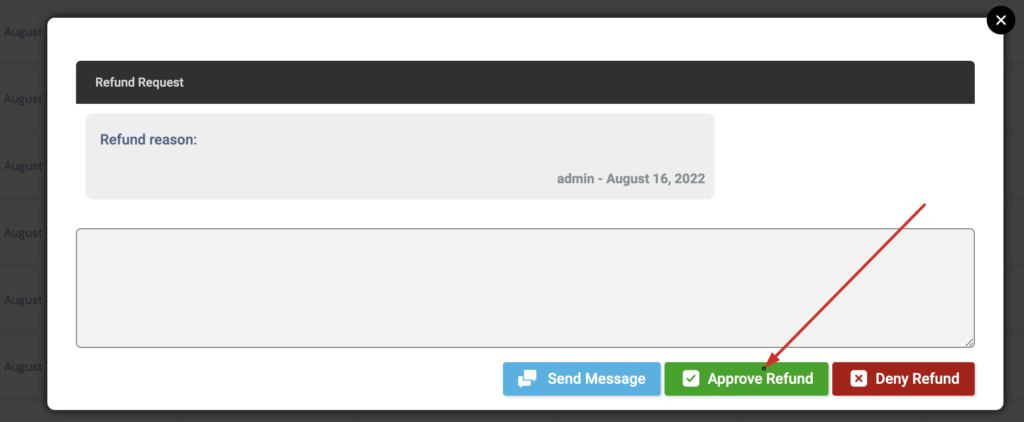
This will automatically send the refund through Stripe - nothing else needs to be done and no admin intervention is needed at any point.
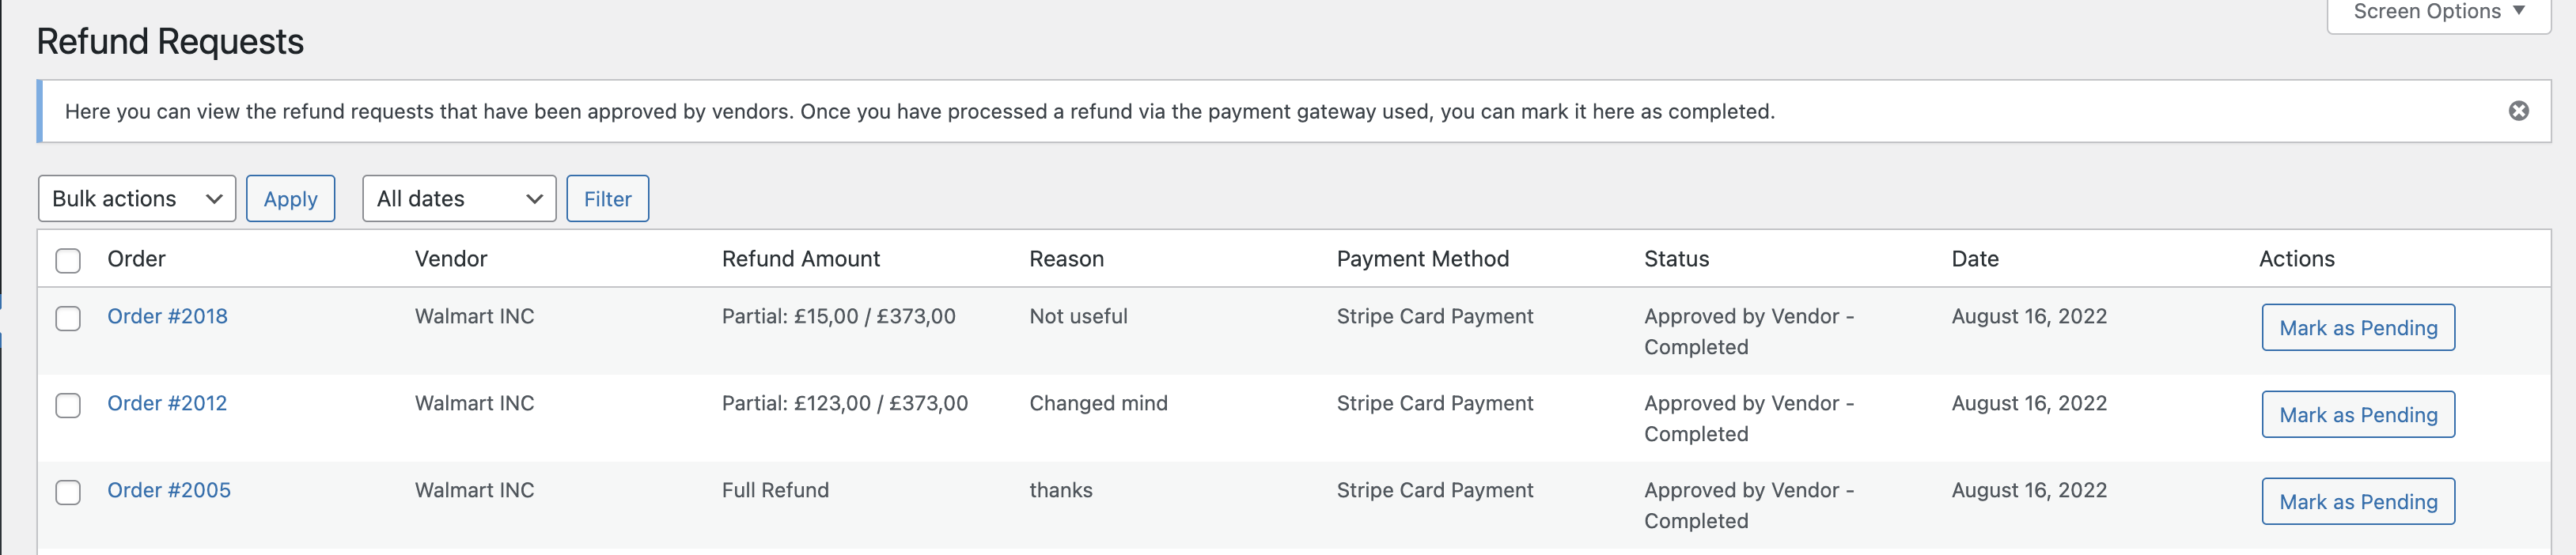
The refund will be visible to the admin under MarketKing -> Refunds, where the refund is already marked as 'Approved by Vendor - Completed', meaning that no admin action is required.
For 3D Secure orders, the admin can also issue refunds via the backend:
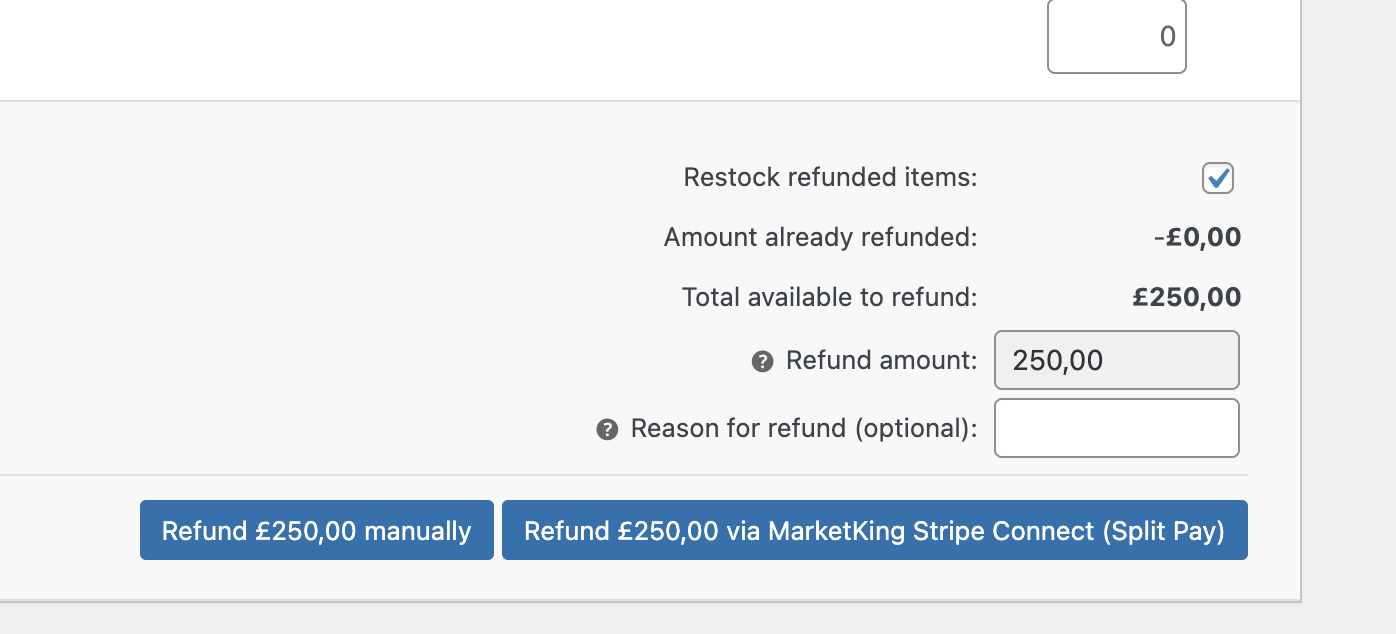
Similarly, these will be processed automatically and sent to Stripe (where it is visible under 'All Transaction'). Both full and partial value refunds are supported with all charge methods.
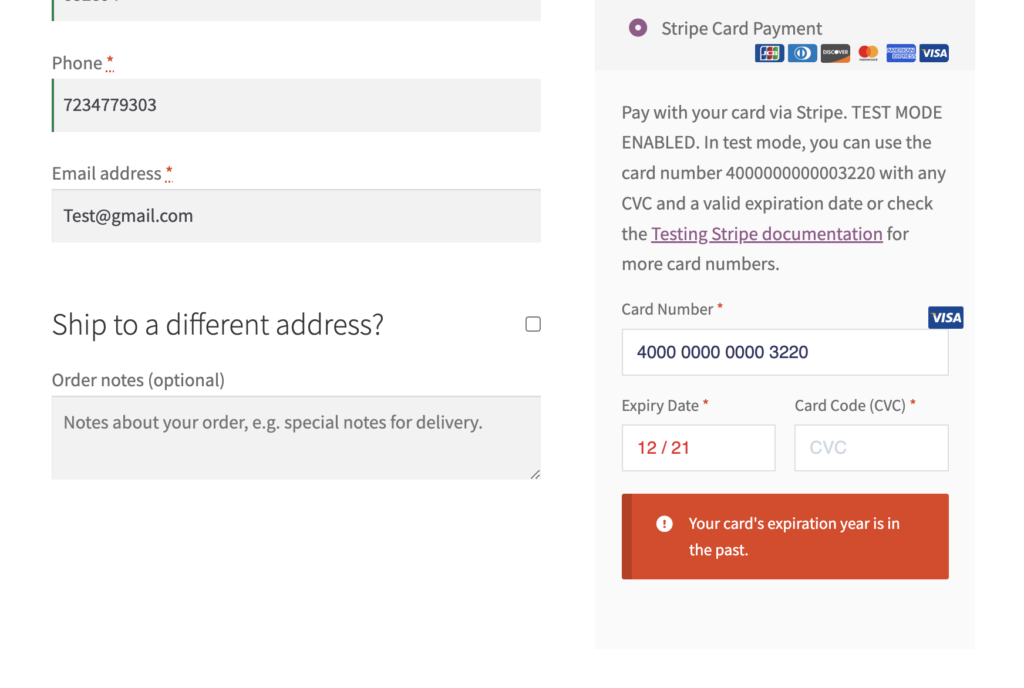
Checkout Experience
Users' checkout experience depends on the Theme used. Here are a few examples:
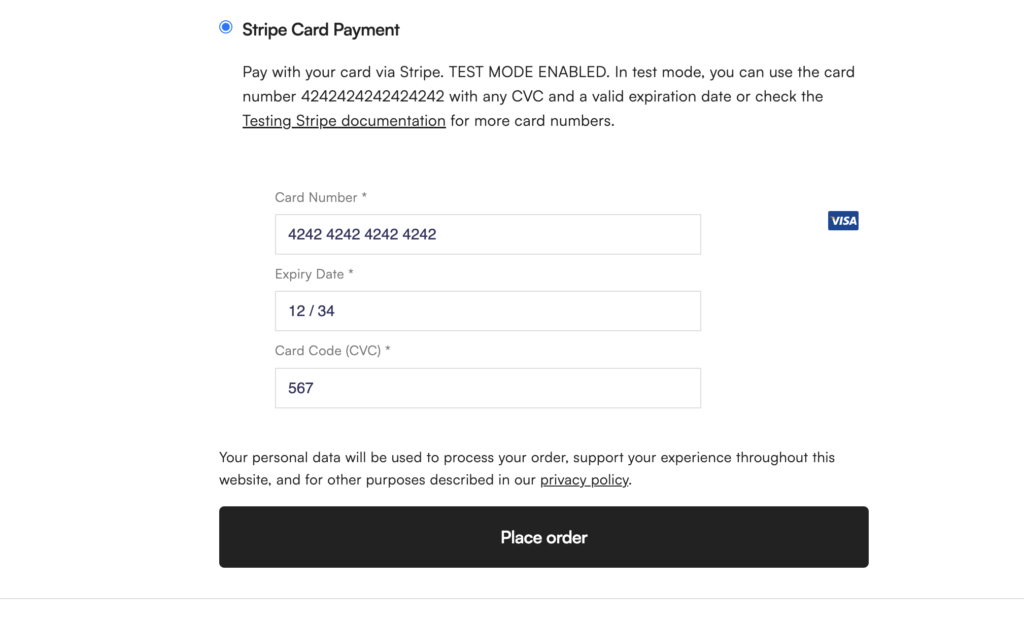
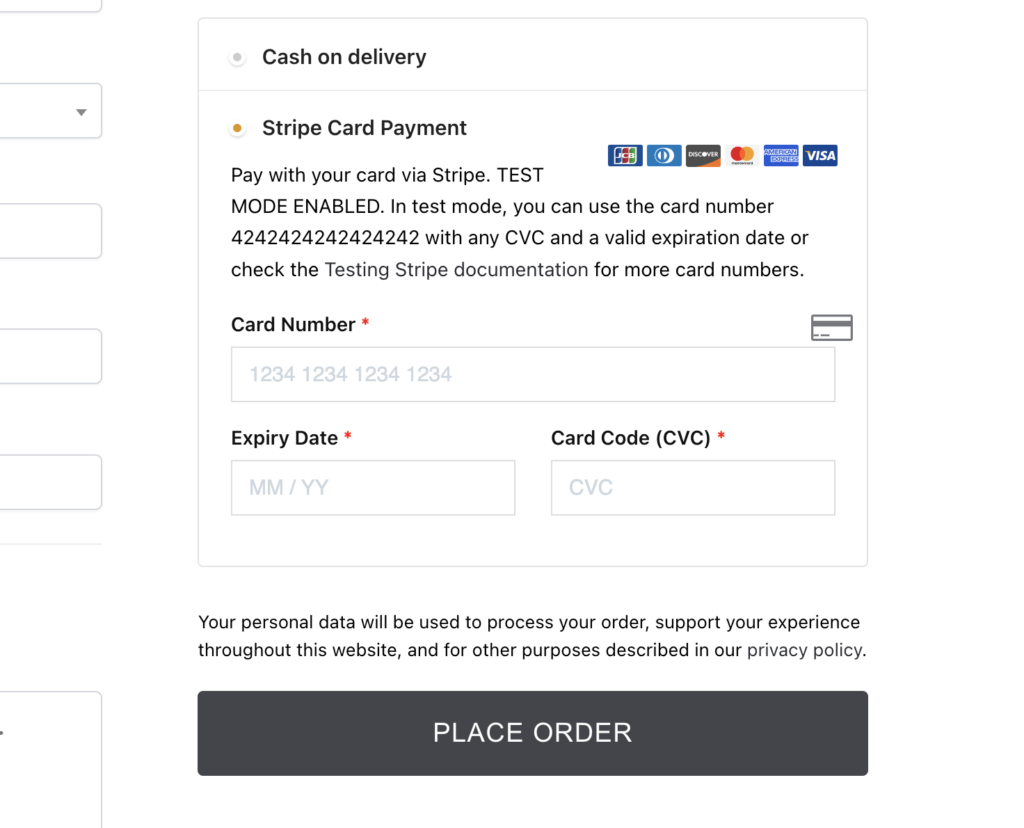
The checkout will also validate card numbers and display the card logos (such as VISA, Mastercard, etc). The checkout will highlight errors such as a wrong expiry date:
Vendor Account Types
By default, MarketKing is set to use Stripe Express accounts.
It is also possible to use Stripe Standard accounts instead, if you add this PHP code snippet to your site:
add_filter('marketking_is_allow_stripe_express_api','__return_false');Here you can read more about the difference between Stripe account types: https://stripe.com/docs/connect/accounts